The purpose of this exercise is to develop and validate a new feature using Test Driven Development (TDD); and to promote the assured feature through the pipeline.
Test Driven Development (TDD) is a software development process that relies on the repetition of a very short development cycle. Requirements are turned into test cases, where the software is developed to pass the tests. In other words, it creates a safety net that serves to keep the developer's problems/bugs at bay while enabling the developer to refactor efficiently. This is opposed to software development that allows software to be added that is not proven to meet requirements.
The TDD cycle can be illustrated with the following diagram:
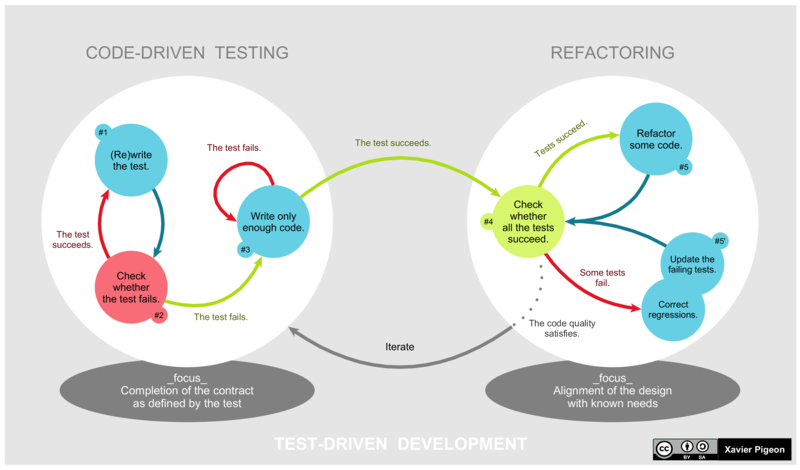
Write a test -
In TDD a new feature begins by writing a test. Write a test that clearly defines a function or one that provides an improvement to an existing function. It's important the developer clearly understands the feature's specification and requirements, or the feature could be wrong from the get-go.
Test Fails -
When a test is first implemented it is expected to fail. This failure validates the test is working correctly as the feature is yet to be implemented.
Write code to make test pass -
This step involves implementing the feature to pass the failed test. Code written at this stage may be inelegant and still pass the test, however this is acceptable as TDD is a recursive cycle which includes code refactoring.
Code Passes tests -
If all tests pass, the developer can be confident that the new code meets the test requirements.
Refactor -
The refactoring step will allow the developer to clean up their code without changing its behaviour. Not changing the behaviour should ensure the tests still pass. The process of refactoring can include; removal of duplication, renaming of object, class, module, variable and method names to clearly represent their current purpose and use, decoupling of functionality and increasing code cohesion.
Repeat -
Starting with another new test, the cycle is then repeated to push forward the functionality. The size of the steps should always be small, with as few as 1 to 10 edits between each test run. If new code does not rapidly satisfy a new test, or other tests fail unexpectedly, the programmer should undo or revert in preference to excessive debugging.
Explanation of Mocha and JS test syntax through Bananalogy! Imagine for a moment; we're not building software but creating a bowl of fruit. To create a Bunch of Bananas component for our fruit bowl we could start with our tests as shown below.

describe is used to group tests together. The string "a bunch of ripe bananas" is for human reading and allows you to identify tests.it is a statement that contains a test. It should contain an assertion such as expect or should. It follows the syntax of describe where the string passed in identifies the statement.As a learner you will be able to
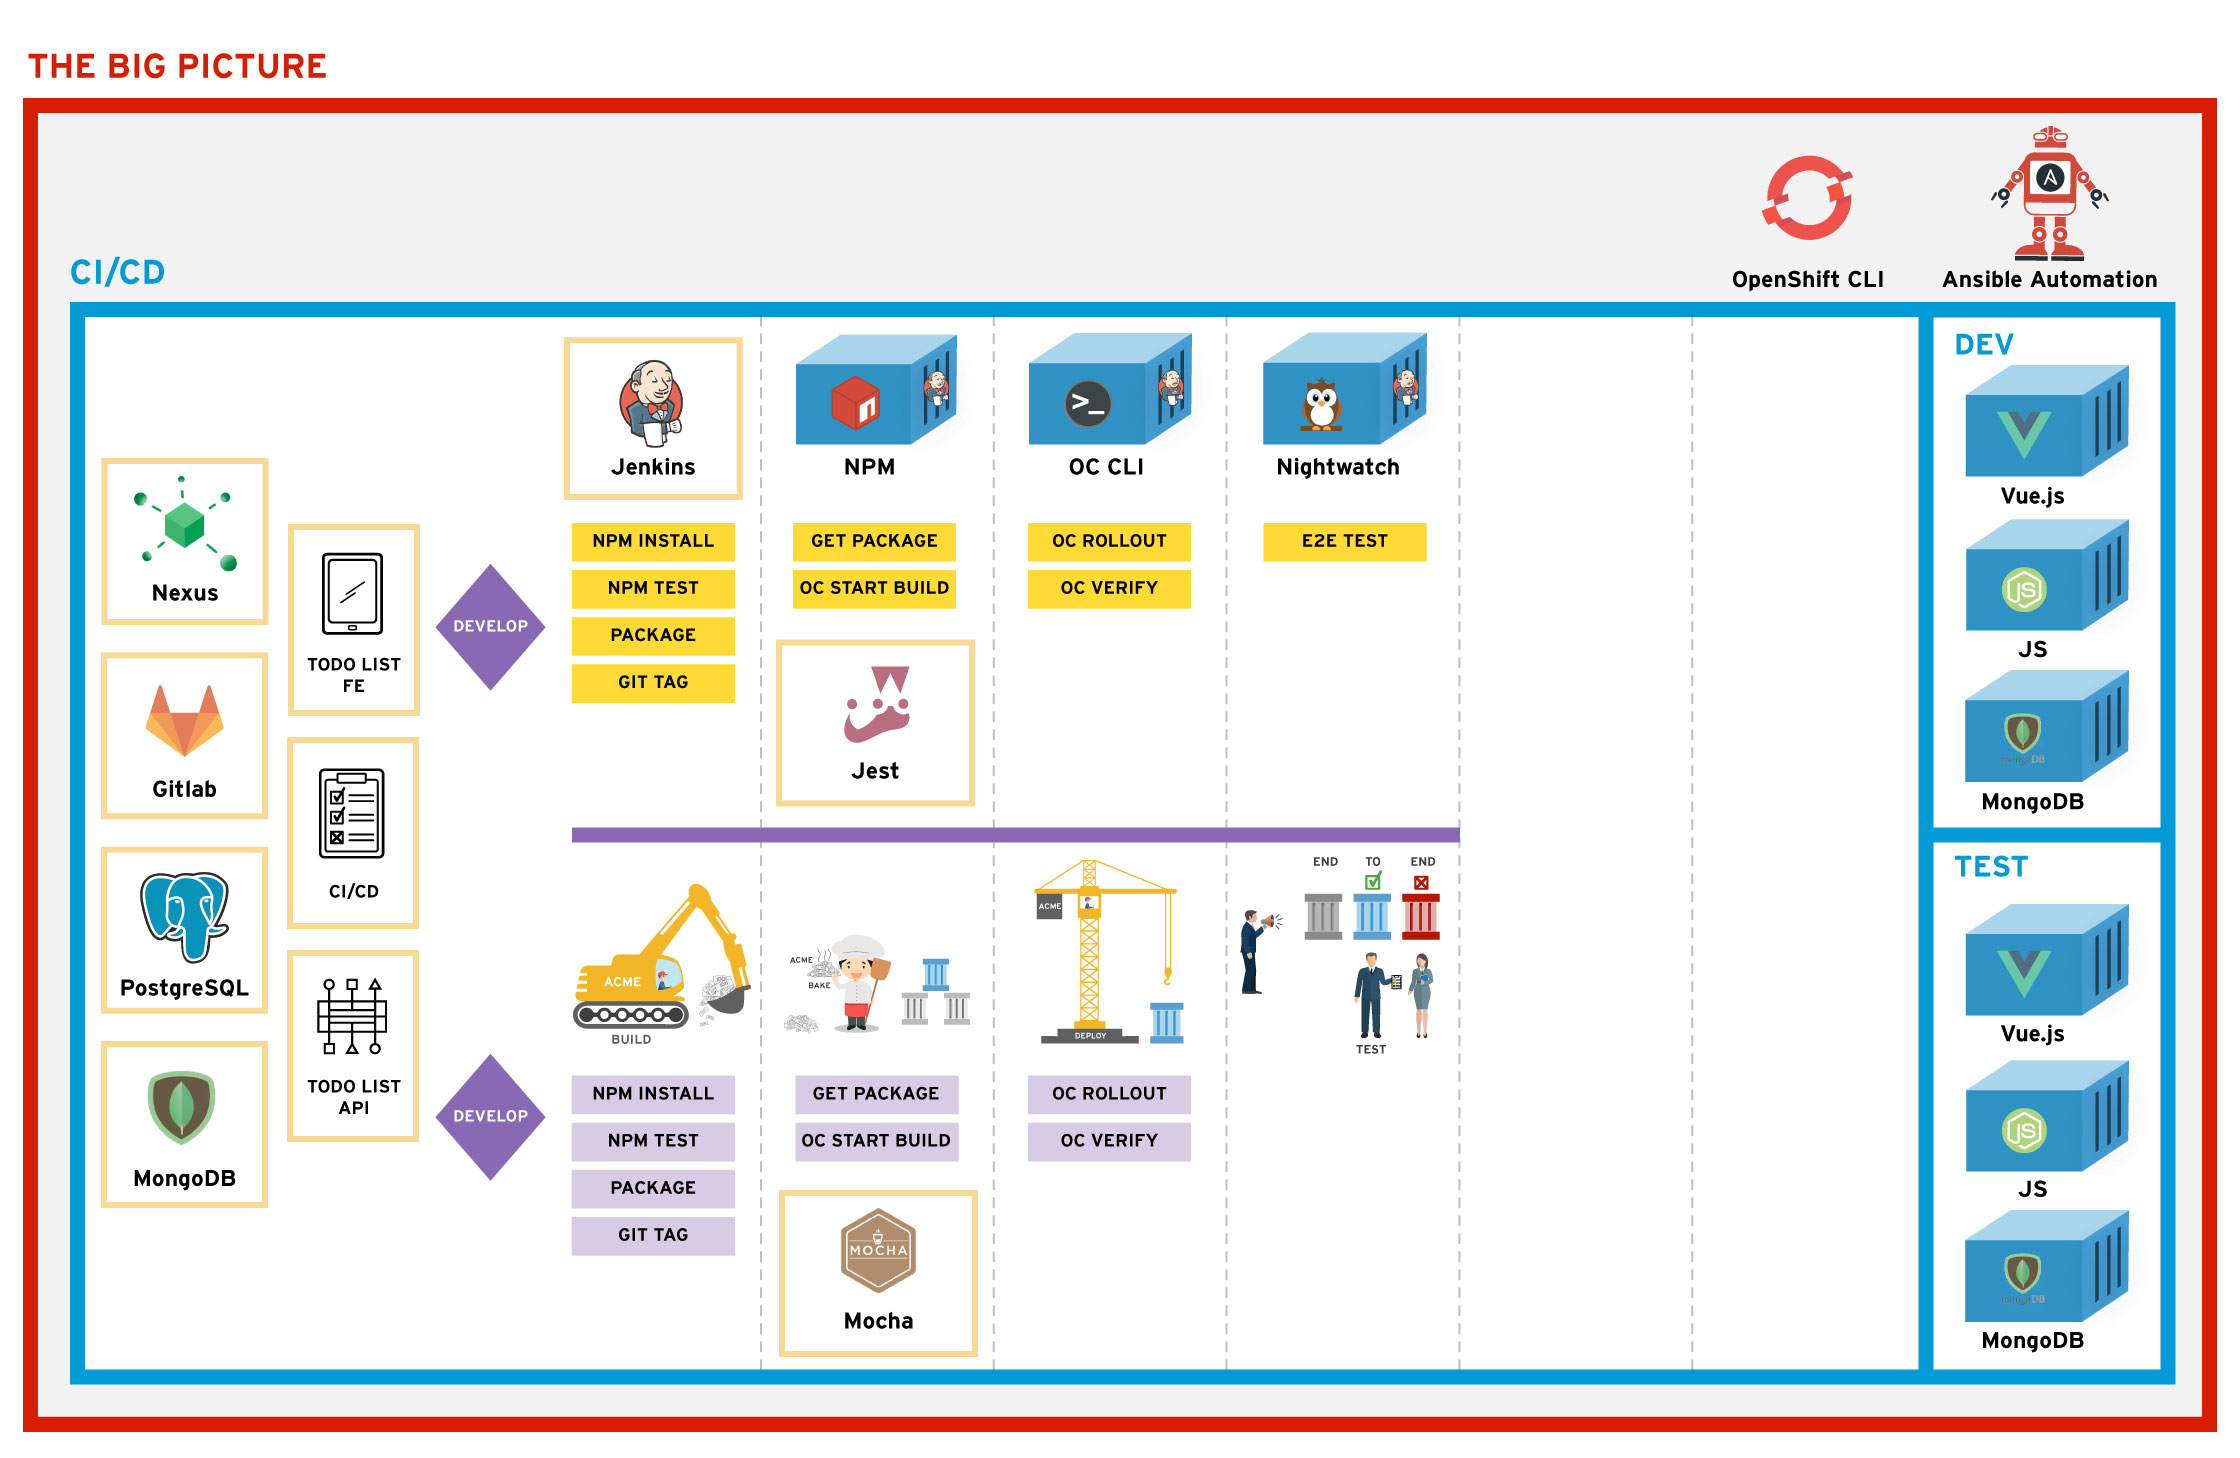
From the previous exercise; we created a simple pipeline. We will now flesh it out with some testing to add gates to our pathway to production.
The goal of this exercise is to add a new component to the application using TDD to create and validate its behaviour. The User story we have been given is as follows:
As a doer I want to mark todos as important so that I can keep track of and complete high priority todos first
Acceptance Criteria
- [ ] should be doable with a single click
- [ ] should add a red flag against the todo when marked important
- [ ] should remove the red colour flag on the flag when important removed
- [ ] should not affect existing todos
On page load:
- [ ] should display existing todos that are not marked important
- [ ] should display existing todos that are marked important with an red flag
In this part we will get familiar with the layout of our tests. We will also improve the pipeline created already by adding some unit tests for the front end & backend along with some end to end tests (e2e) to validate the full solution
In this exercise we will execute our test for the front end locally. Once verified we will add them to Jenkins.
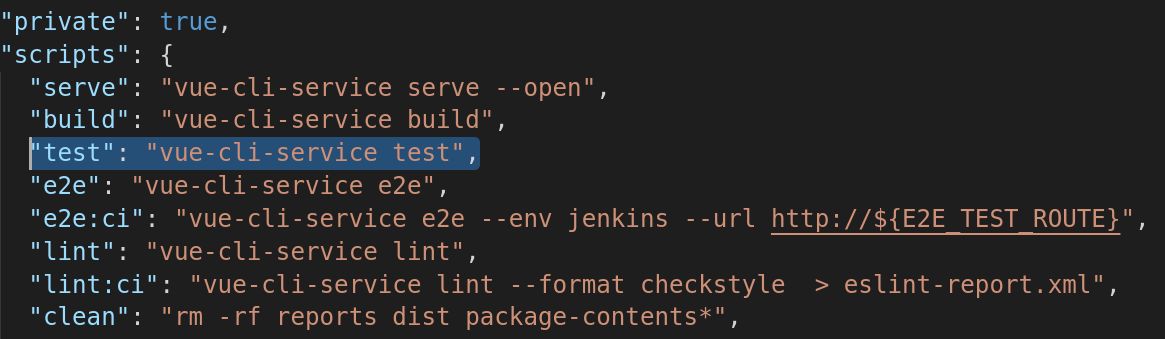
todolist-fe directory and run test.bash cd todolist-fe bash npm run test test is an alias used that runs vue-cli-service test from the scripts object in package.json
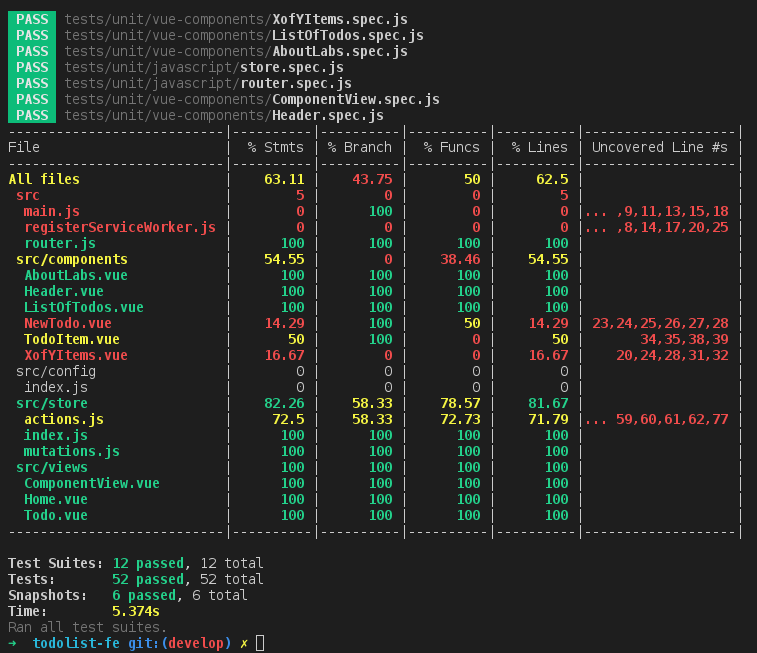
This command will run all *spec.js files. Our test files are stored in the following places. There are 12 front end test files stored in these directories: todolist-fe/tests/unit/vue-components/* & todolist-fe/tests/unit/javascript/*
You should see an output similar to the following. The above command has run a test suite for every *.spec.js file. The table generated in the terminal shows the code coverage. We're going to be focusing on the unit tests for now.
todolist-api and verify that all the tests run. If you have an ExpressJS server already running from previous exercise; you should kill it before running the tests. The mocha test suite will launch a dev server for running the tests. There are 2 API test files: todolist-api/server/api/todo/todo.spec.js & todolist-api/server/mocks/mock-routes.spec.js for our API and the Mocks server. Remember to start the mongo container before running the testsbash cd todolist-api bash npm run mongo:start bash npm run test NOTE: On Windows systems, tests will fail because Mocha is unable to find the
*.spec.jsfiles. Edit thepackage.jsonfile, and remove the single quotes aroundserver/**/*.spec.jsin thetestline as follows:
"test": "node_modules/.bin/nyc node_modules/.bin/mocha server/**/*.spec.js --exit"
https://jenkins-<YOUR_NAME>-ci-cd.<APPS_URL>.dev-todolist-fe-build and then click the configure button on the left-hand side.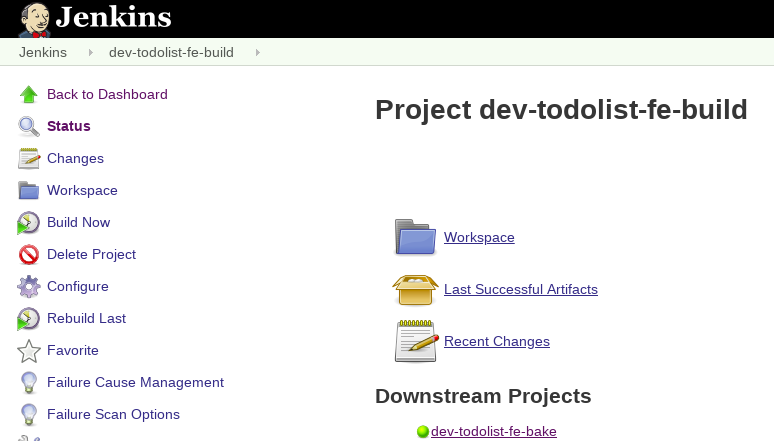
Build part of the configuration page and add npm run test below npm install.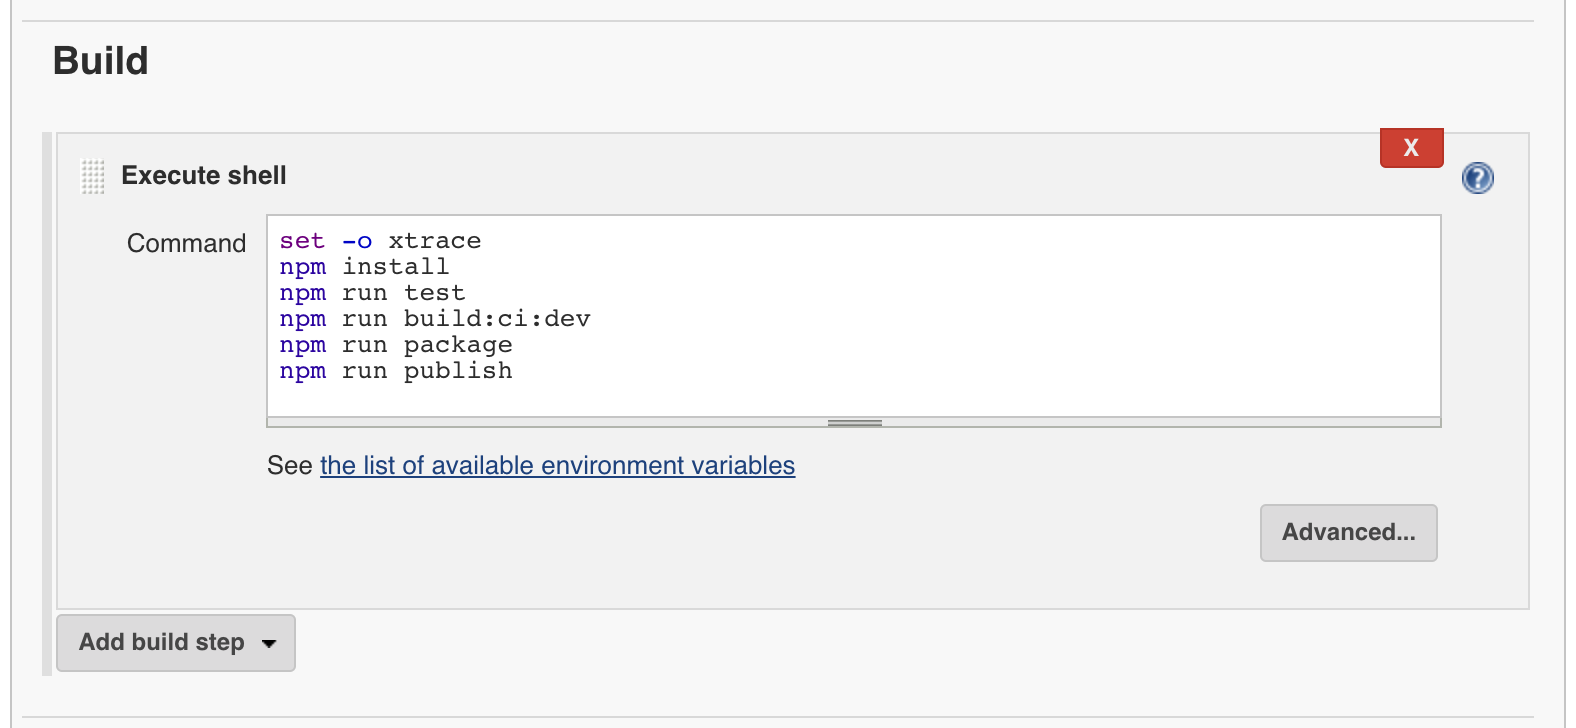
Post-build Actions section and click Add post-build action. Select Publish xUnit test result report (Jenkins might place this at the top of the Post-build Actions list).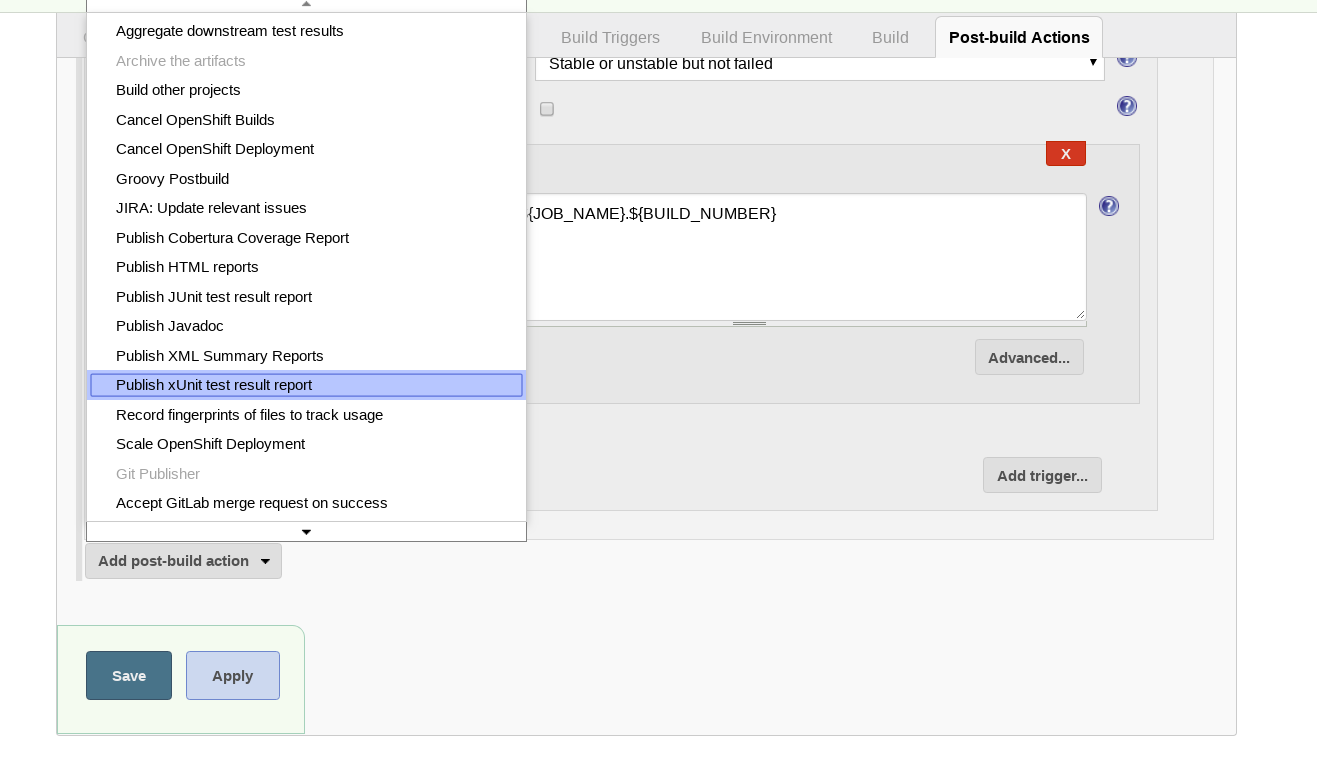
Add button under Publish xUnit test result report and select JUnit. In the pattern field enter test-report.xml. In the Failed Tests Thresholds input box enter 0 under Red Ball Total. It should look a little something like this: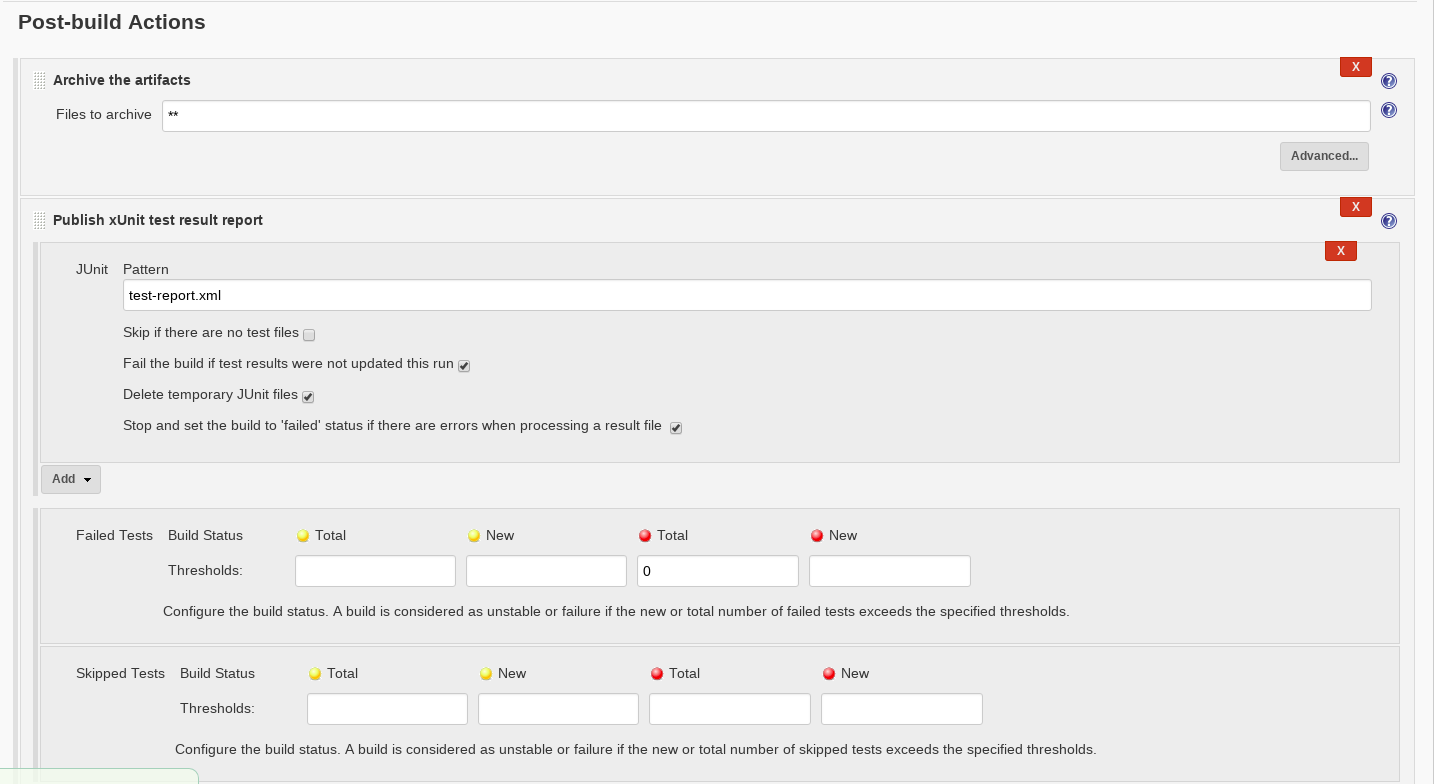
Save at the bottom to save the changes. Run the dev-todolist-fe-build job and verify that this passes and the build and bake jobs are both triggered.Unit tests are a great way to get immediate feedback as part of testing an application. End to end tests that drive user behaviour are another amazing way to ensure an application is behaving as expected.
In this part of the exercise, we will add a new stage to our pipeline called dev-todolist-fe-e2e that will run after the deploy has been completed. End to end tests will use Nightwatch.js to orchestrate a selenium webdriver instance that controls the web browser; in this case Google Chrome!
Let's start by checking that our tests execute locally. On the terminal move to the todolist-fe folder. Our end to end tests are stored in tests/e2e/specs/. The vuejs cli uses Nightwatch.js and comes pre-configured to run tests against Google Chrome. We have created some additional configuration in the root of the project nightwatch.config.js to run headless in CI mode on Jenkins.bash cd todolist-fe
Run the tests locally by executing the following. This should start the dev server and run the test. You may see the browser pop up and close while tests execute.bash npm run e2e

NOTE: On Windows systems, you will see the firewall pop-up and ask permission to allow access. Click allow access to continue.
With tests executing locally; let's add them to our Jenkins pipeline. To do this; we'll create a new job and connect it up to our todolist-fe jobs. Open Jenkins and create a New Item called dev-todolist-fe-e2e. Make this Job Freestyle.
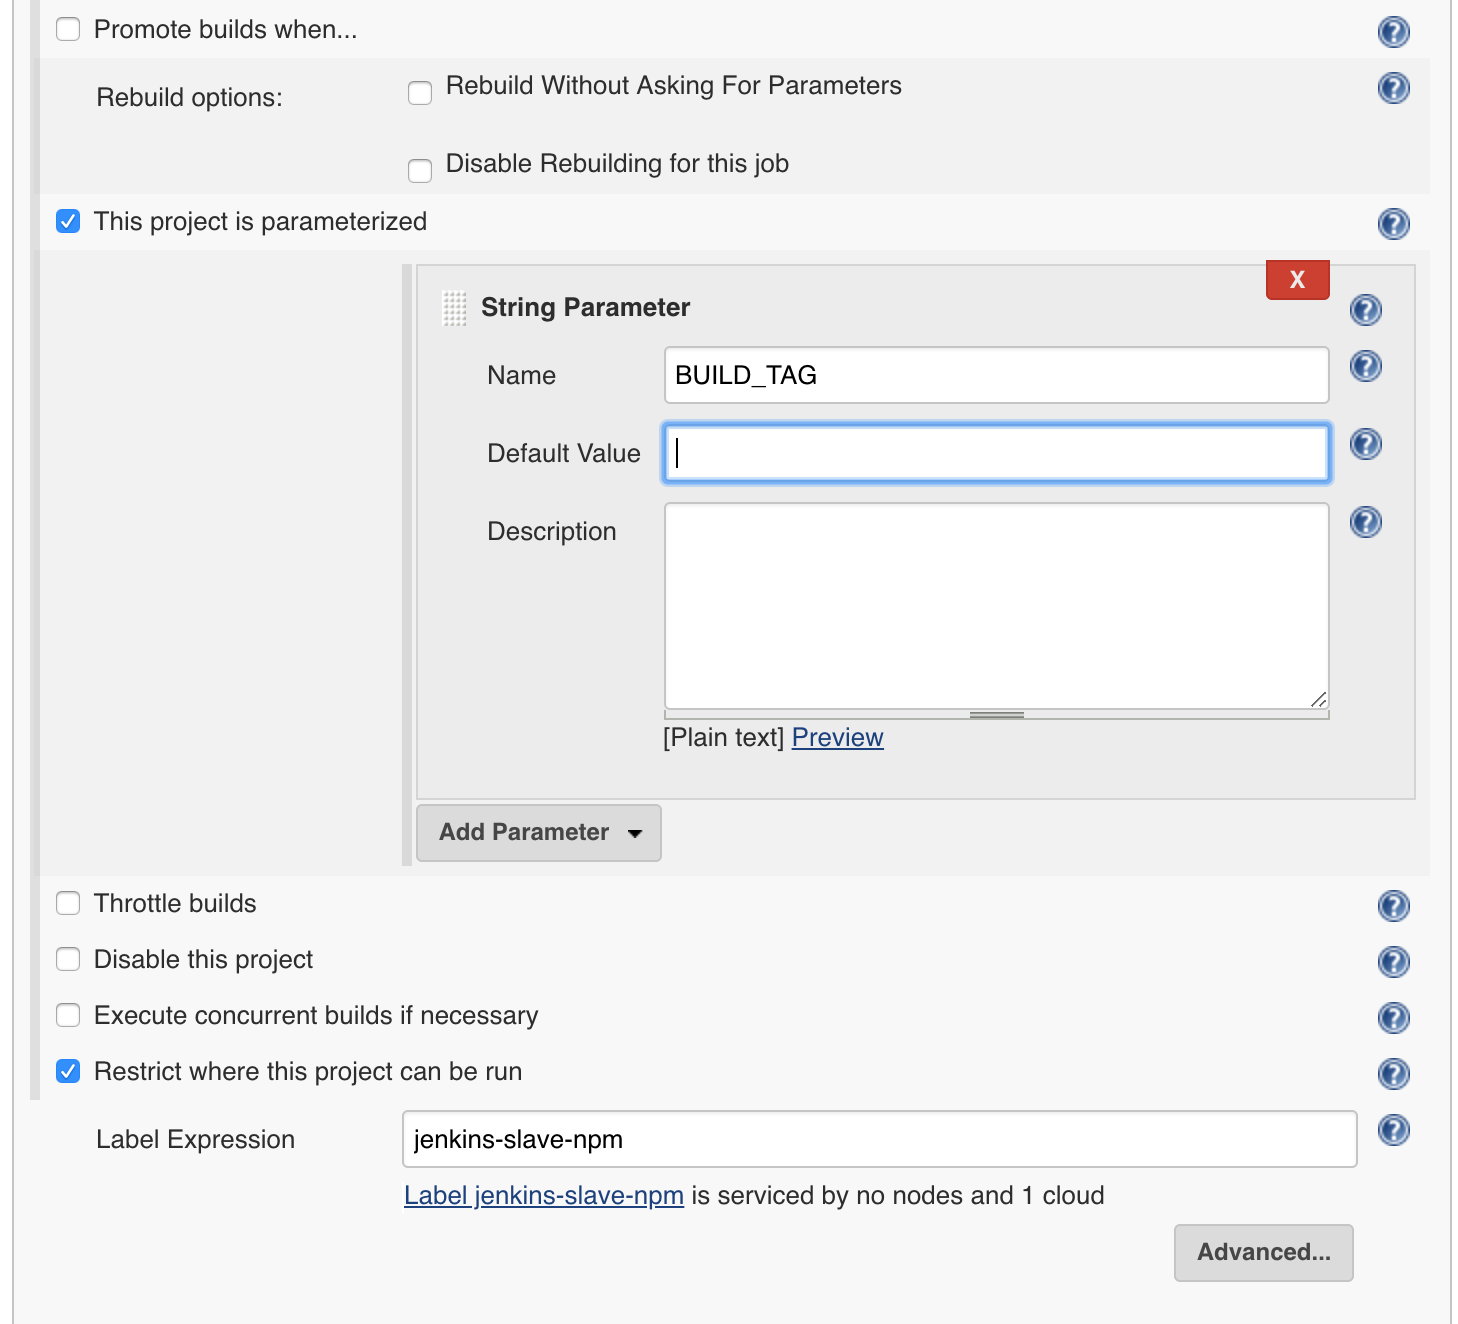
On the configuration page (under the general tab); Set the Label for the job to run on as jenkins-slave-npm. Check the box marking the build parameterised and add a String parameter of BUILD_TAG as done before
todolist-fe app. Set the branch to refs/tags/${BUILD_TAG}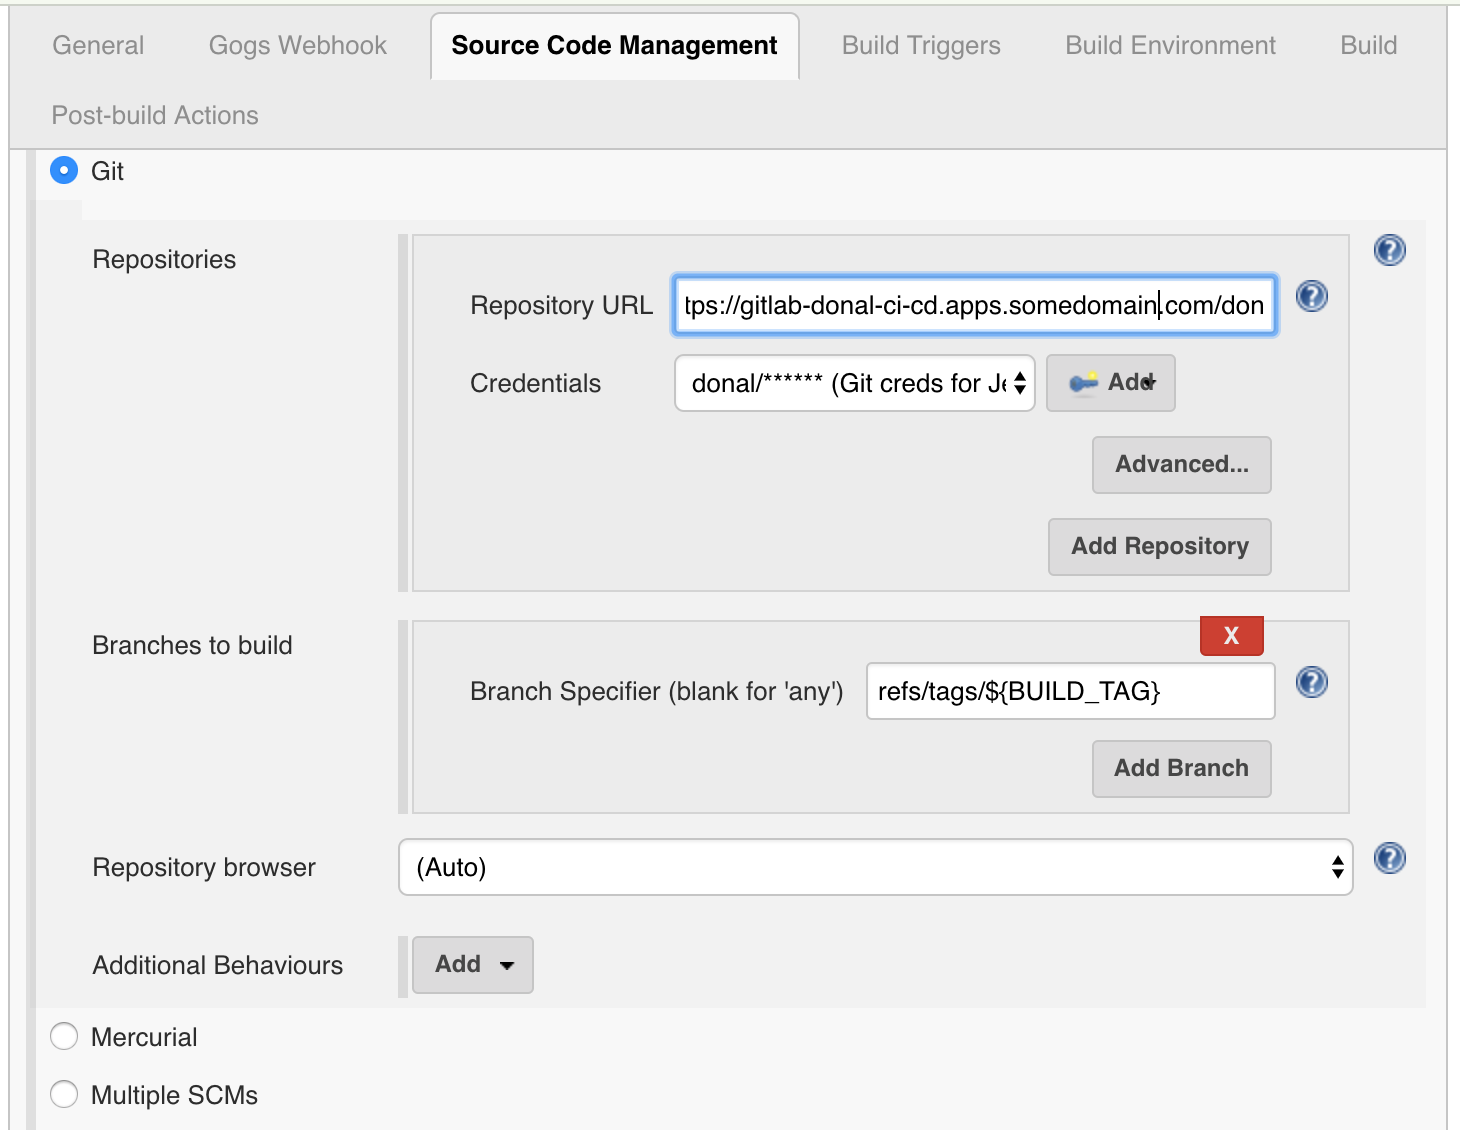
Set Color ANSI Console Output on the Build Environment section
On the Build section; add a build step to execute shell and fill in the following substituting <YOUR_NAME> accordingly:bash export E2E_TEST_ROUTE=todolist-fe-<YOUR_NAME>-dev.<APPS_URL> npm install npm run e2e:ci 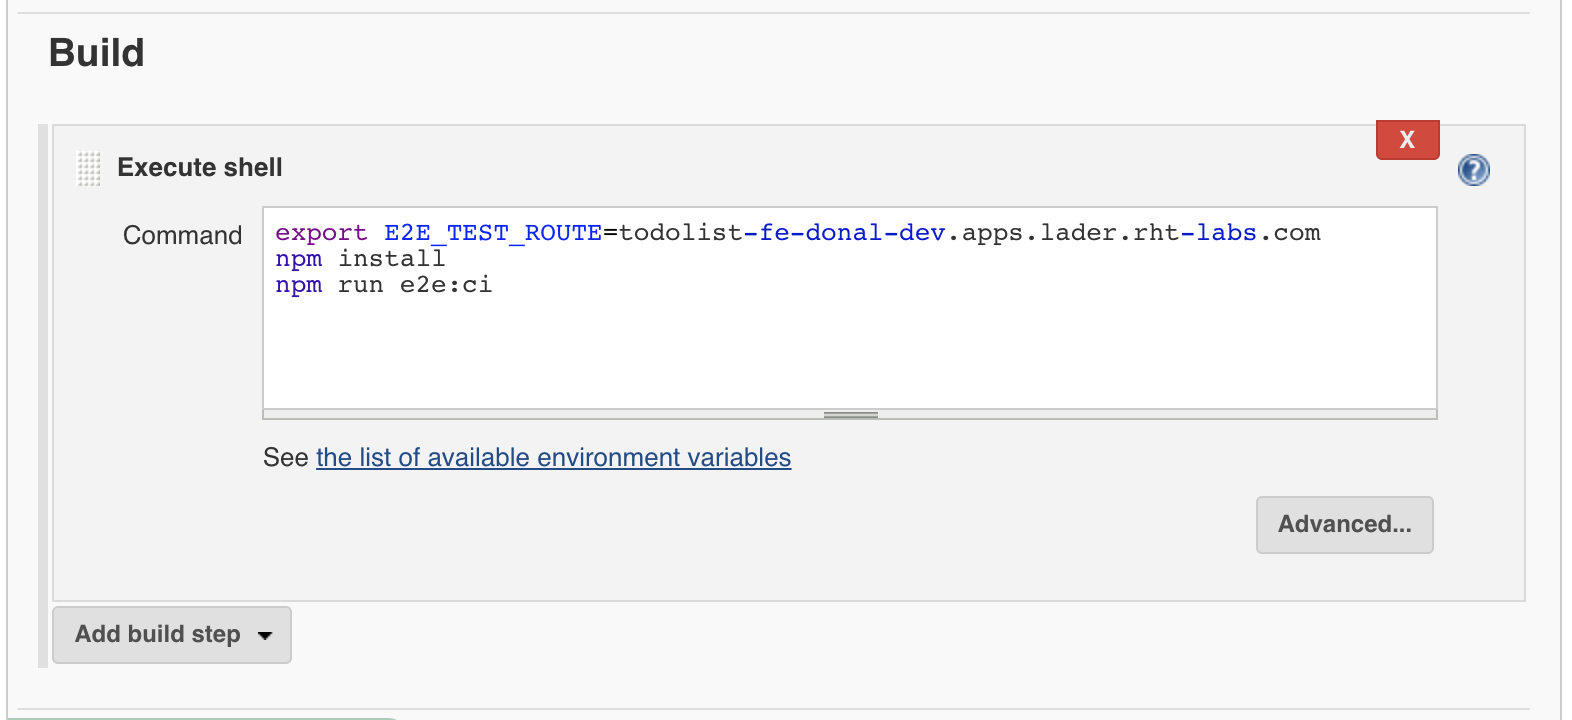
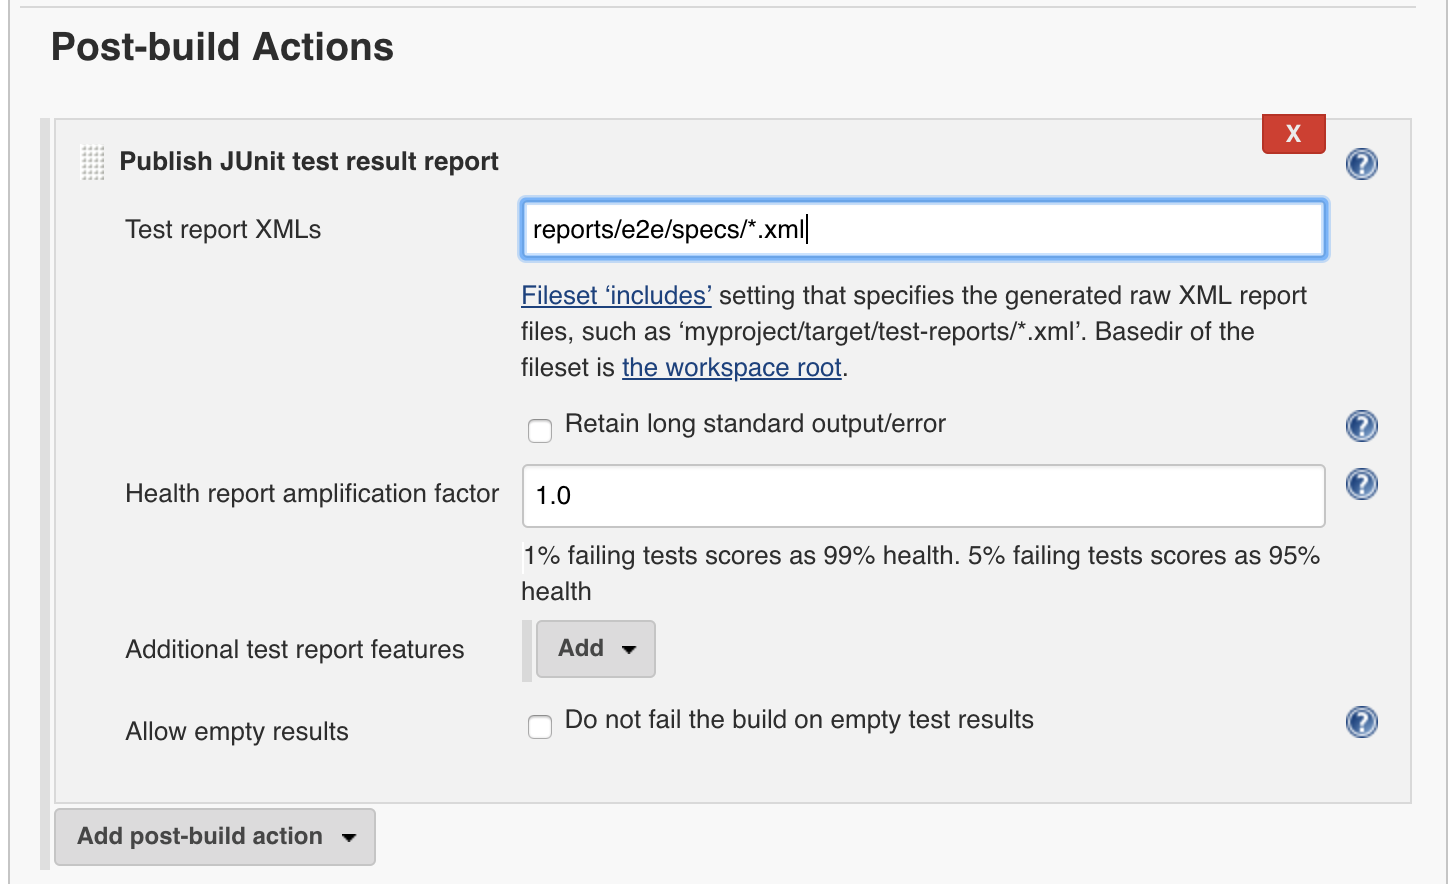
Add a Post Build action to Publish Junit test result report. Add reports/e2e/specs/*.xml to the report location and save the configuration to be brought back to the Job's homepage.
dev-todolist-fe-deploy job. Open the dev-todolist-fe-deploy job and hit configure. In the Post-build actions section of this job add a Trigger parameterised build on other jobs. Set the Projects to build to be dev-todolist-fe-e2e. Add a Parameter and set the it to the Current build parameters. Save the settings.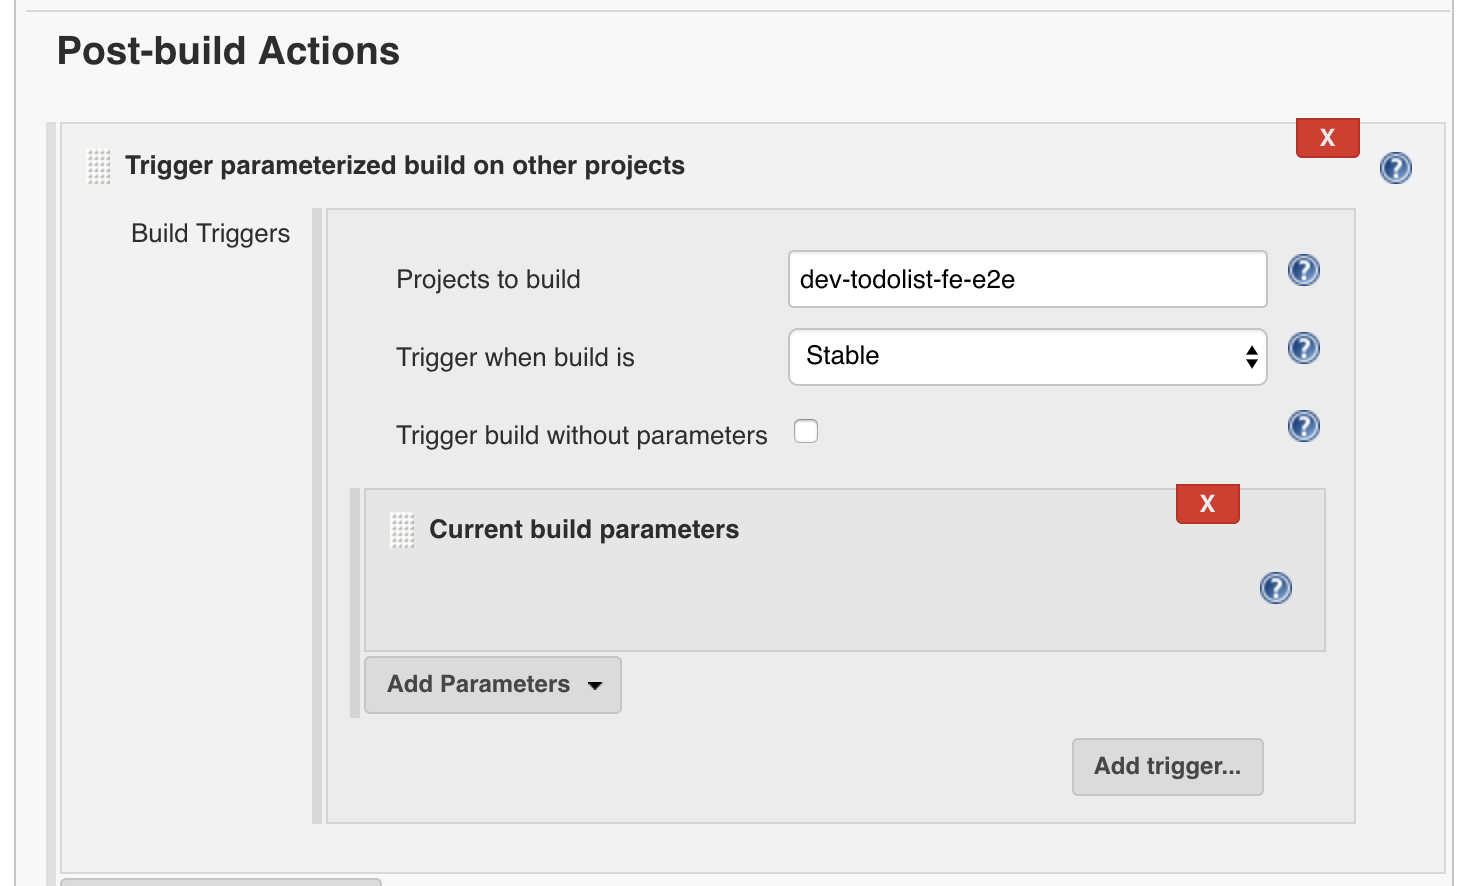
In this exercise we will introduce a new feature to create an important flag on the todos. In order to be able to build and test our feature we will use TDD
As a doer I want to mark todos as important so that I can keep track of and complete high prirority todos first
Acceptance Criteria
- [ ] should be doable with a single click
- [ ] should add a red flag against the todo when marked important
- [ ] should remove the red colour flag on the flag when important removed
- [ ] should not affect existing todos
On page load:
- [ ] should display existing todos that are not marked important
- [ ] should display existing todos that are marked important with an red flag
Using Mocha as our test runner; we will now write some tests for backend functionality to persist our important-flag. The changes required to the backend are minimal but we will use TDD to create our test first, then implement the functionality.
Create a new branch in your todolist-api app for our feature and push it to the remotebash cd todolist-api bash git checkout -b feature/important-flag bash git push -u origin feature/important-flag
Navigate to the server/api/todo/todo.spec.js file. This contains all of the existing todo list api tests. These are broken down into simple describe("api definition", function(){}) blocks which is BDD speak for how the component being tested should behave. Inside of each it("should do something ", function(){}) statements we use some snappy language to illustrate the expected behaviour of the test. For example a GET request of the api is described and tested for the return to be of type Array as follows.
describe("GET /api/todos", function() {
    it("should respond with JSON array", function(done) {
        request(app)
        .get("/api/todos")
        .expect(200)
        .expect("Content-Type", /json/)
        .end(function(err, res) {
            if (err) return done(err);
            // Test goes here
            res.body.should.be.instanceof(Array);
            done();
        });
      });
});
where:
- describe is used to group tests together into a collection asserting some feature; for example the get all todos api.
- it is an individual test statement and should contain an expect or a should statement asserting behaviour of the API under test.
- request is a library for making http calls to the api.
- .expect(200) asserts the HTTP Return Code
- res.body.should.be.instanceof(Array); is the actual test call
- done(); tells the test runner that mocha has finished execution. This is needed as the http calls are asynchronous.
important flag. We expect the front end to introduce a new property on each todo that gets passed to the backend called important. The API will need to handle this new property and pass it into the mongodb. Let's begin implementing this functionality by writing our test case. Navigate to the PUT /api/todos section of the server/api/todo/todo.spec.js test file (which should be at the bottom)
npm run mongo:* scripts)npm run test
// Exercise 3 test case! comment). A PUT request responds in our API with the data that it has just updated. So provided that MongoDB accepted the change, the API will respond with an object that has the important property on it. To write our test; edit the template test by completing the following:
it("should ...") to describe the important flag we're testing.send() to include important: true property.expect() to be .expect(200)res.body.important is true below the // YOUR TEST GO HERE line.// Exercise 3 test case!
it("should mark todo as important and persist it", function(done) {
request(app)
.put("/api/todos/" + todoId)
.send({
title: "LOVE endpoint/server side testing!",
completed: true,
important: true
})
.expect(200)
.expect("Content-Type", /json/)
.end(function(err, res) {
if (err) return done(err);
res.body.should.have.property("_id");
res.body.title.should.equal("LOVE endpoint/server side testing!");
// YOUR TEST GO HERE
res.body.important.should.equal(true);
done();
});
});
bash npm run test 
server/api/todo/todo.model.js. Add an additional property on the schema called important and make its type Boolean.const TodoSchema = new Schema({
title: String,
completed: Boolean,
important: Boolean
});
server/config/seed.js file so that the pre-generated todos have an important property. Add important: false below completed: * for each object. Don't forget to add a comma at the end of the completed: * line.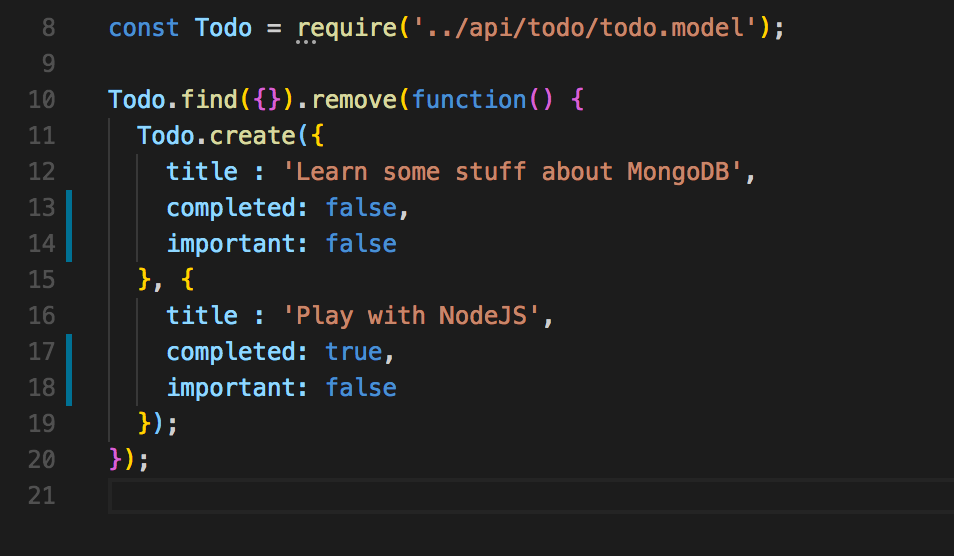
With your changes to the Database schema updated; re-run your tests. The tests should pass.bash npm run test
Commit your code to the feature/important-flag branch and then merge onto the develop branch as followsbash git add . bash git commit -m "ADD backend schema updates" bash git push bash git checkout develop bash git merge feature/important-flag bash git push
Using Jest as our test runner and the
vue-test-utilslibrary for managing our vue components; we will now write some tests for front end functionality to persist our important-flag. The changes required to the front end are quite large but we will use TDD to create our test first, then implement the functionality.
Our TodoList App uses vuex to manage the state of the app's todos and axios HTTP library to connect to the backend. Vuex is an opinionated framework for managing application state and has some key design features you will need to know to continue with the exercise.
In vuex the application state is managed by a store. The store houses all the todos we have retrieved from the backend as well as the getter methods for our array of todos. In order to make changes to the store, we could call the store directly and update each todo item but as earlier said; vuex is an opinionated module with its own way of updating the store. It is bad practice to call the store directly.
There are two parts of the lifecycle to updating the store, the actions & mutations. When the user clicks a todo to mark it as complete; the actions are called. An action could involve a call to the backend or some pre-processing of the data. Once this is done, the change is committed to the store by calling the mutation function. A store should only ever be manipulated through a mutation function. Calling the mutation will then update the todo object in the app's local store for rendering in the view.
For example; when marking a todo as done in the UI, the following flow occurs
* The TodoItem.vue calls the markTodoDone() function which dispatches an event to the store.
* This calls the updateTodo() function in the actions.js file
* The action will update the backend db (calling our todolist-api) with our updated todo object.
* The action will commit the change to the store by calling the mutation method MARK_TODO_COMPLETED
* The MARK_TODO_COMPLETED will directly access the store object and update it with the new state value
* The ListOfTodos.vue component is watching the store for changes and when something gets updated it re-renders the TodoItem.vue.
The implementation of our important flag will follow this same flow.
MARK_TODO_COMPLETED. Create a new branch in your todolist-fe app for our feature and push it to the remotecd todolist-fe
git checkout -b feature/important-flag
git push -u origin feature/important-flag
--watch on our tests. This will keep re-running our tests everytime there is a file change. It is handy to have this running in a new terminal session.bash npm run test -- --watch NOTE: You may see an
ENOSPCerror on Linux systems like the following:bash ERROR jest exited with code 1. npm ERR! code ELIFECYCLE npm ERR! errno 1 npm ERR! todolist-fe@1.0.0 test: `vue-cli-service test "--watch"` npm ERR! Exit status 1
To fix this error, run the following command:bash echo fs.inotify.max_user_watches=524288 | sudo tee -a /etc/sysctl.conf && sudo sysctl -p
No tests found related to files changed since last commit is on show; hit a on the terminal to re-run all tests.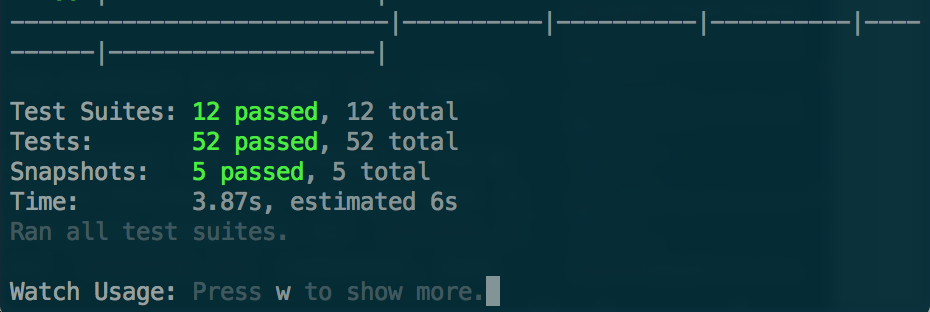
TodoItem.vue to handle having a red flag and that it is clickable. Our app is going to need to persist the changes in the backend so we'll want to make changes to our actions.js and mutations.js to keep the api and local copy of the store in sync. Let's start with our TodoItem.vue component. Open the tests/unit/vue-components/TodoItem.spec.js file. This has been templated with some example test to correspond with our A/Cs for speed of doing the exercise. Find the describe block for our important flag tests. It is setup already with a beforeEach() hook for test setup.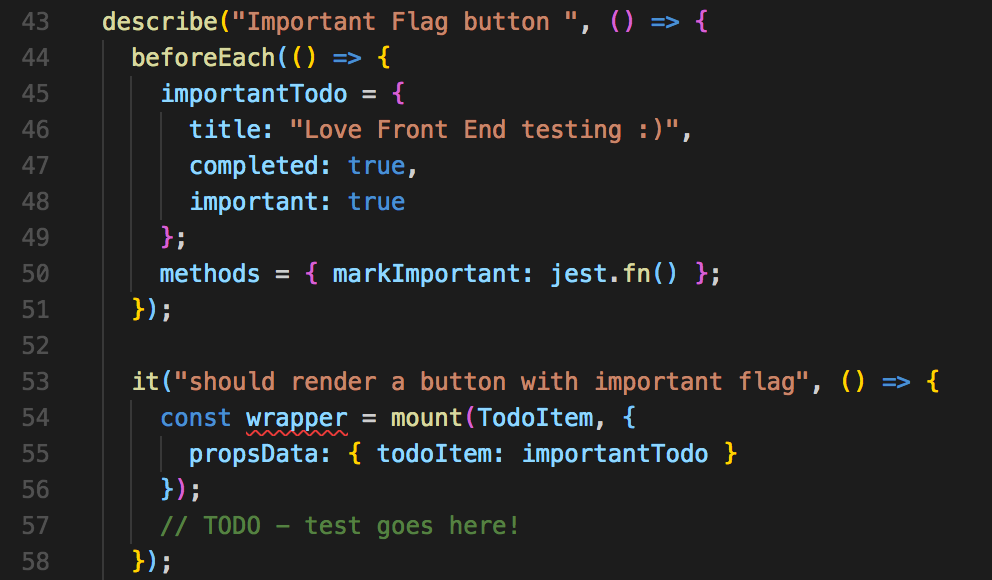
TodoItem.vue component takes a property of todos when rendering. This setup is already done for each of our tests so all we have to do is fill in our assertions.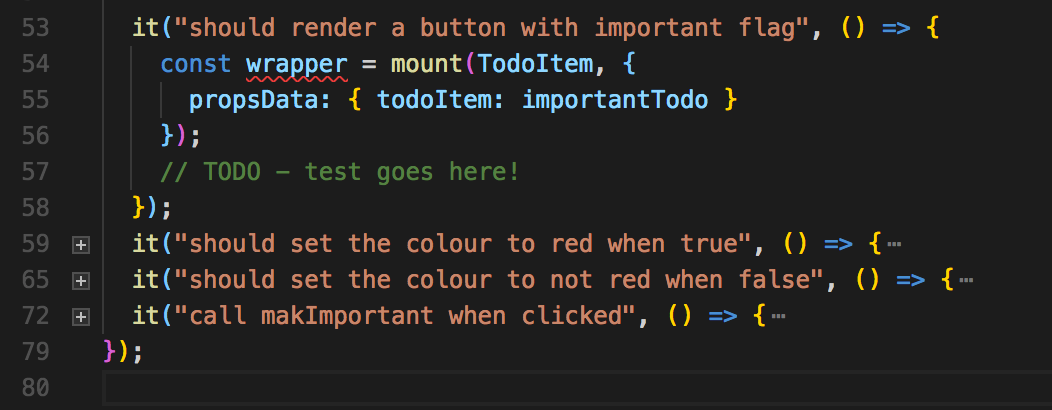
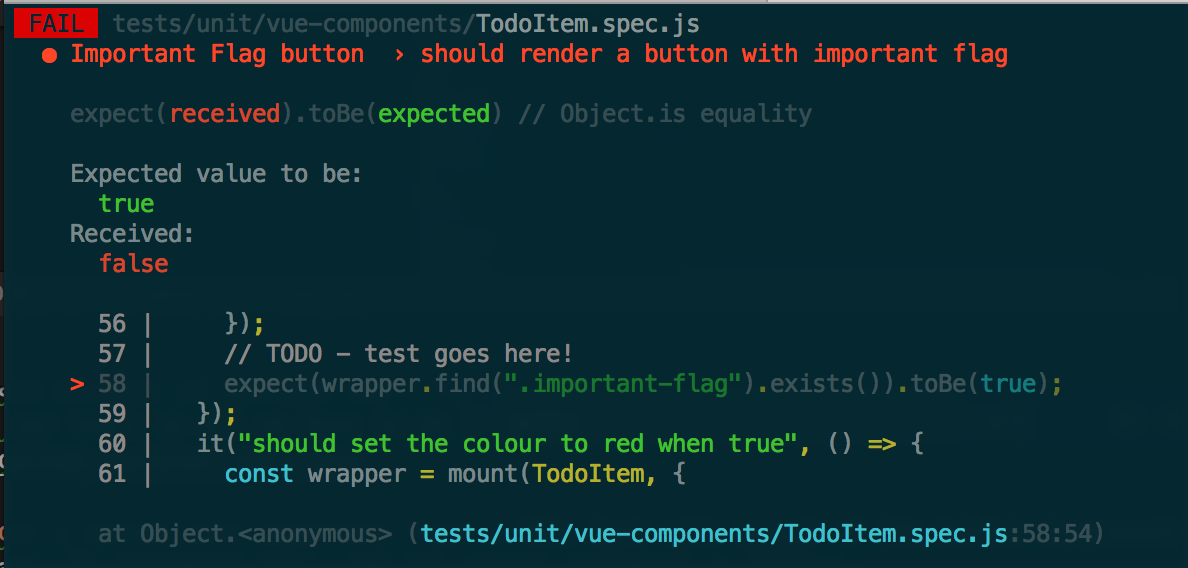
it("should render a button with important flag". This test will assert if the button is present on the page and it contains the .important-flag CSS class. To implement this; add the expect statement as follows below the // TODO - test goes here! comment. it("should render a button with important flag", () => {
const wrapper = mount(TodoItem, {
propsData: { todoItem: importantTodo }
});
// TODO - test goes here!
expect(wrapper.find(".important-flag").exists()).toBe(true);
});
.red-flag CSS property to be present when important is true and not when false. Complete the expect statements in your test file as shown below for both tests. it("should set the colour to red when true", () => {
const wrapper = mount(TodoItem, {
propsData: { todoItem: importantTodo }
});
// TODO - test goes here!
expect(wrapper.find(".red-flag").exists()).toBe(true);
});
it("should set the colour to not red when false", () => {
importantTodo.important = false;
const wrapper = mount(TodoItem, {
propsData: { todoItem: importantTodo }
});
// TODO - test goes here!
expect(wrapper.find(".red-flag").exists()).toBe(false);
});
TodoItem.spec.js we want to create should simulate this behaviour. Implement the it("call markImportant when clicked", () test by first simulating the click of our important-flag and asserting the function markImportant() to write is executed. it("call markImportant when clicked", () => {
const wrapper = mount(TodoItem, {
methods,
propsData: { todoItem: importantTodo }
});
// TODO - test goes here!
const input = wrapper.find(".important-flag");
input.trigger("click");
expect(methods.markImportant).toHaveBeenCalled();
});
With our tests written for the feature's UI component, let's implement our code to pass the tests. Explore the src/components/TodoItem.vue. Each vue file is broken down into 3 sections
<template></template> contains the HTML of our component. This could include references to other Components also<script></script> contains the JavaScript of our component and is essentially the logic for our component. It defines things like properties, methods and other components<style></style> contains the encapsulated CSS of our componentUnderneath the </md-list-item> tag, let's add a new md-button. Add an .important-flag class on the md-button and put the svg of the flag provided inside it.
    </md-list-item>
    <!-- TODO - SVG for use in Exercise3 -->
    <md-button class="important-flag">
        <svg height="24" viewBox="0 0 24 24" width="24" xmlns="http://www.w3.org/2000/svg" ><path d="M0 0h24v24H0z" fill="none"/><path d="M14.4 6L14 4H5v17h2v-7h5.6l.4 2h7V6z"/></svg>
    </md-button>
npm run serve) should show the flag appear in the UI. It is clickable but won't fire any events and the colour is not red as per our requirement. Let's continue to implement the colour change for the flag. On our <svg/> tag, add some logic to bind the css to the property of a todo.important by adding :class="{'red-flag': todoItem.important}". This logic will apply the CSS class when todo.important is true.<md-button class="important-flag">
<svg :class="{'red-flag': todoItem.important}" height="24" viewBox="0 0 24 24" width="24" xmlns="http://www.w3.org/2000/svg" ><path d="M0 0h24v24H0z" fill="none"/><path d="M14.4 6L14 4H5v17h2v-7h5.6l.4 2h7V6z"/></svg>
</md-button>
<script></script> tags in the Vue file, implement the markImportant(). We want to wire this to the action to updateTodo, just like we have in the markCompleted() call above it. We also need to pass an additional property to this method called important markImportant() {
// TODO - FILL THIS OUT IN THE EXERCISE
this.$store.dispatch("updateTodo", {id: this.todoItem._id, important: true});
console.info("INFO - Mark todo as important ", this.todoItem.important);
},
markImportant() by adding @click="markImportant()" to the <md-button> tag <!-- TODO - SVG for use in Exercise3 -->
<md-button class="important-flag" @click="markImportant()">
<svg :class="{'red-flag': todoItem.important}" height="24" viewBox="0 0 24 24" width="24" xmlns="http://www.w3.org/2000/svg" ><path d="M0 0h24v24H0z" fill="none"/><path d="M14.4 6L14 4H5v17h2v-7h5.6l.4 2h7V6z"/></svg>
</md-button>
store/actions.js and add important: false below completed: false in the addTodo(){} action.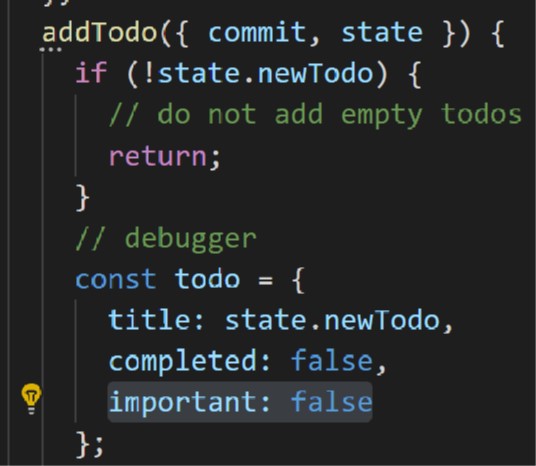
bash git add . bash git commit -m "Implementing the todoitem flag" bash git push npm run serve
Open our local todolist app (http://localhost:8080/#/todo). If we try to use our important flag, we should see it's still not behaving as expected; this is because we're not updating the state of the app in response to the click event.
We need to implement the actions and mutations for our feature. Let's start with the tests. Open the tests/unit/javascript/actions.spec.js and navigate to the bottom of the file. Our action should should commit the MARK_TODO_IMPORTANT to the mutations. Scroll to the end of the test file and implement the skeleton test by adding expect(commit.firstCall.args[0]).toBe("MARK_TODO_IMPORTANT"); as the assertion.
  it("should call MARK_TODO_IMPORTANT", done => {
    const commit = sinon.spy();
    state.todos = todos;
    actions.updateTodo({ commit, state }, { id: 1, important: true }).then(() => {
        // TODO - test goes here!
        expect(commit.firstCall.args[0]).toBe("MARK_TODO_IMPORTANT");
        done();
    });
  });
src/store/actions.js file and scroll to the bottom to the updateTodo() method. Complete the if block by adding commit("MARK_TODO_IMPORTANT", i); as shown below.updateTodo({ commit, state }, { id, important }) {
let i = state.todos.findIndex(todo => todo._id === id);
if (important) {
// TODO - add commit important here!
commit("MARK_TODO_IMPORTANT", i);
} else {
commit("MARK_TODO_COMPLETED", i);
}
mutation for our feature. Again, starting with the tests... Open the tests/unit/javascript/mutations.spec.js to find our skeleton tests at the bottom of the file. Our mutation method is responsible for toggling the todo's important property between true and false. Let's implement the tests for this functionality by setting important to be true and calling the method expecting the inverse. Then let's set it to false and call the method expecting the inverse. Add the expectations below the // TODO - test goes here! comment as done previously. it("it should MARK_TODO_IMPORTANT as false", () => {
state.todos = importantTodos;
// TODO - test goes here!
mutations.MARK_TODO_IMPORTANT(state, 0);
expect(state.todos[0].important).toBe(false);
});
it("it should MARK_TODO_IMPORTANT as true", () => {
state.todos = importantTodos;
// TODO - test goes here!
state.todos[0].important = false;
mutations.MARK_TODO_IMPORTANT(state, 0);
expect(state.todos[0].important).toBe(true);
});
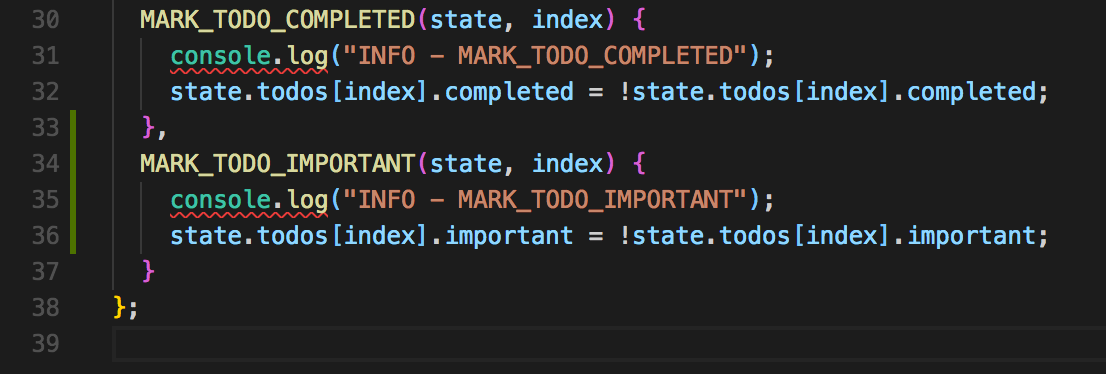
src/store/mutations.js and add another function called MARK_TODO_IMPORTANT below the MARK_TODO_COMPLETED to toggle todo.important between true and false. NOTE - add a , at the end of the MARK_TODO_COMPLETED(){} function call. MARK_TODO_IMPORTANT(state, index) {
console.log("INFO - MARK_TODO_IMPORTANT");
state.todos[index].important = !state.todos[index].important;
}
All our tests should now be passing. On the watch tab where they are running, hit a to re-run all tests and update any snapshots with u if needed.
With all our tests now passing, let's commit our code. On the terminal, run
git add .
git commit -m "Implementing the store and actions"
git push
git checkout develop
git merge feature/important-flag
git push --all
*-dev namespace in the OCP web console.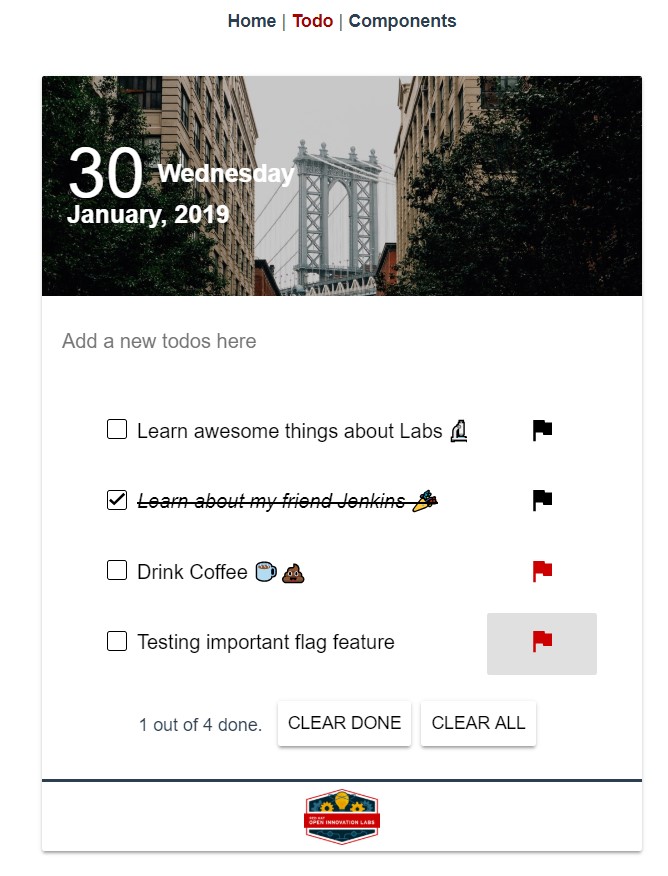
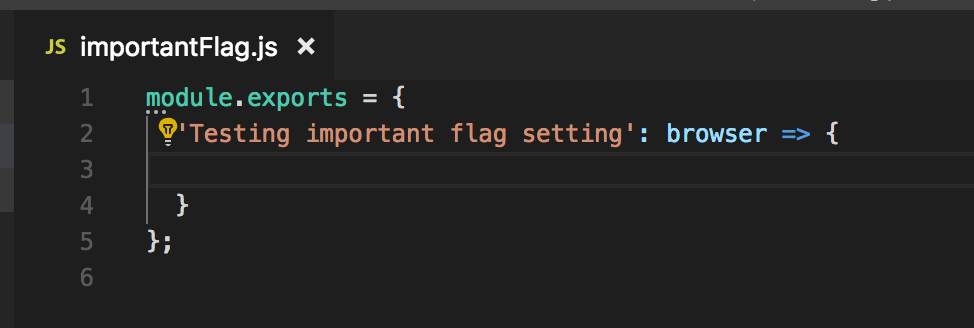
Using Nightwatch.js We will write a reasonably simple e2e test to test the functionality of the feature we just implemented.
touch tests/e2e/specs/importantFlag.js
NOTE: Windows users should create this new file using a text editor.
Open this new file in your code editor and set out the initial blank template for an e2e test as below:
Now get the test to access the todos page and wait for it to load. The url can be taken from process.env.VUE_DEV_SERVER_URL
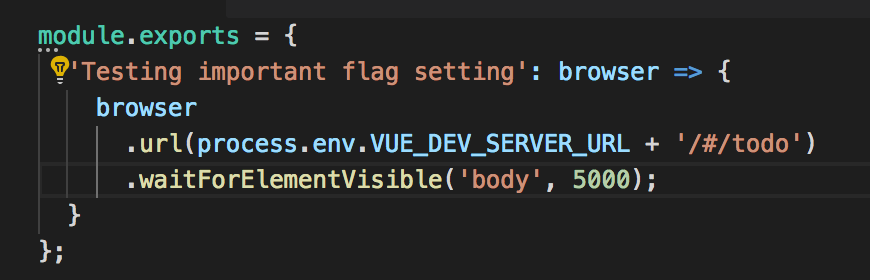
Write code to do the following:
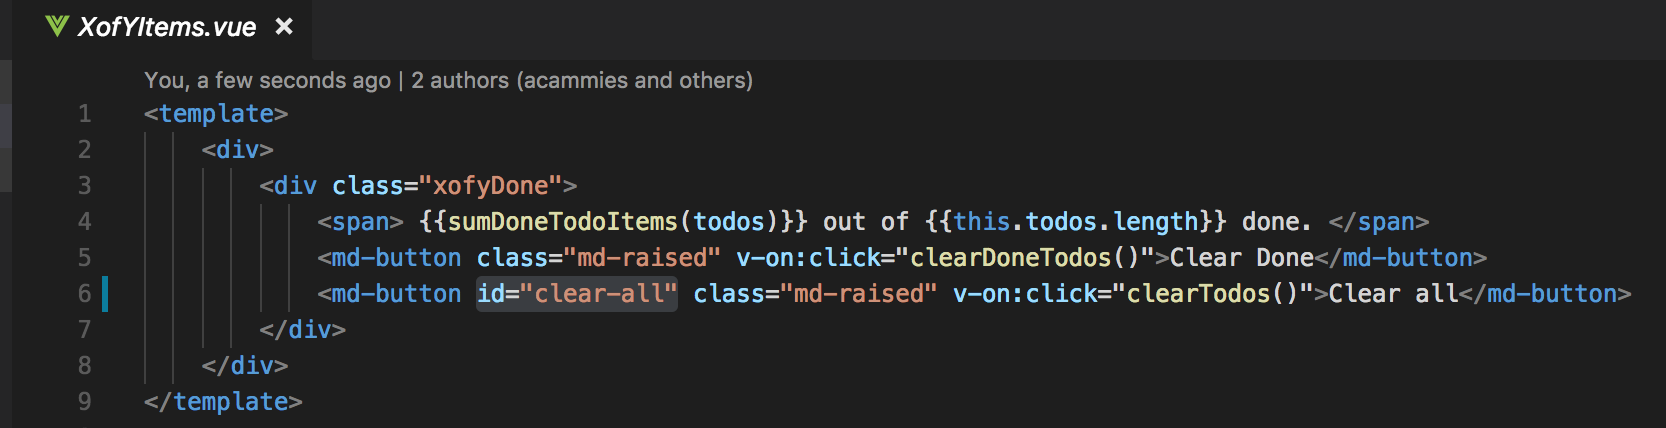
You will need to reference the clear all button from the test code. We will therefore have to go to src/components/XofYItems.vue and add id="clear-all" to the clear all button.
Write the following test code. The pauses allow for the body of the page to render the todo list before exercising the test code:javascript module.exports = { "Testing important flag setting": browser => { browser .url(process.env.VUE_DEV_SERVER_URL + '/#/todo') .waitForElementVisible("body", 5000) .pause(5000) .click('#clear-all') .pause(2000) .setValue('input',['set a todo',browser.Keys.ENTER]) .pause(2000) .assert.elementPresent(".important-flag") .assert.elementNotPresent(".red-flag") .click('.important-flag') .end(); } }; 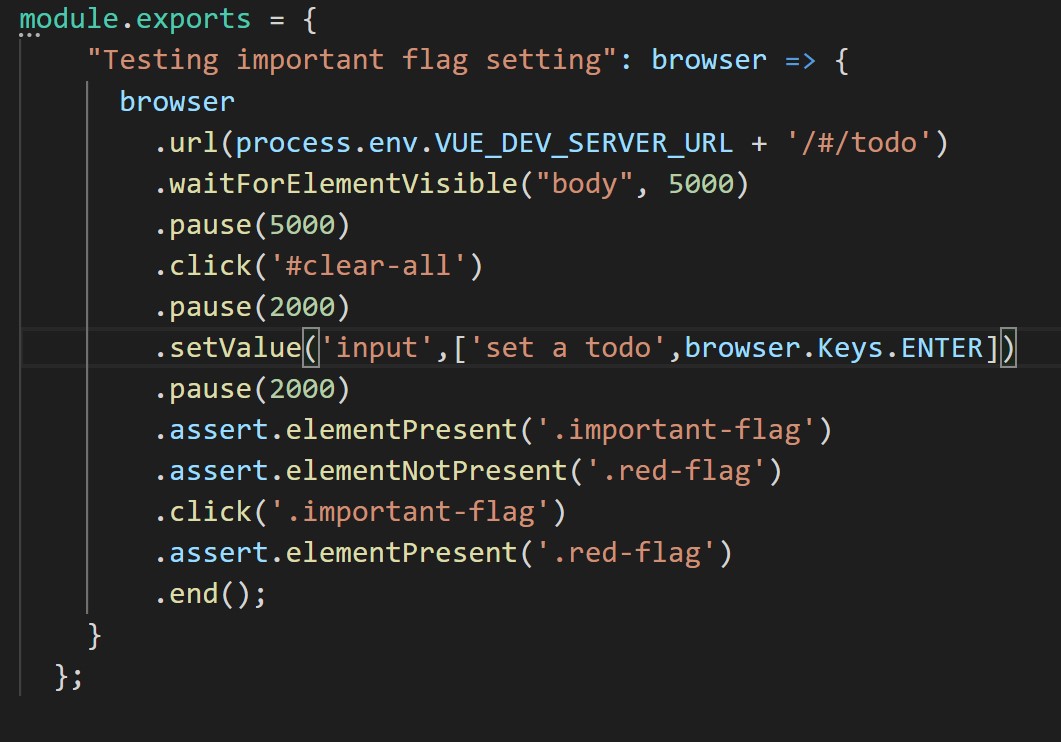
At this point we should have a working e2e test. We can run this by using npm run e2e. When all tests pass, we can push up these changes.
git add .
git commit -m "Implementing e2e tests"
git push
