Merge branch 'master' of github.com:rht-labs/enablement-docs
7 files added
15 files modified
| | |
|---|
| | | [Course Content](https://rht-labs.github.io/enablement-docs/#/) |
|---|
| | | |
|---|
| | | ## Slides |
|---|
| | | Use the [Open Innovation Labs reveal.js template](https://github.com/rht-labs/slides-template) to create new content. Add your slides and commit them to the `slides` dir |
|---|
| | | Slides are currently only available on Red Hat's Google Drive (https://drive.google.com/open?id=1Rk0XAn2WjY-cVAhGbCNiL6EdiiS-hxbK). We are working on a solution to make this content more openly available. |
|---|
| | | |
|---|
| | | In the mean time, if you are unable to access the link above and would like to see some of the content, please contact the author. |
|---|
| | | |
|---|
| | | |
|---|
| | | ## Exercises |
|---|
| | | Exercises are created using [Docsify](https://docsify.js.org/#/). Write docs in Markdown and use [Docsify](https://github.com/QingWei-Li/docsify-cli) cli to serve them. Store your lab exercises in the `exercises/<lab-number>` dir. |
|---|
| | |
|---|
| | |  |
|---|
| | | |
|---|
| | | ## Exercise Intro |
|---|
| | | In this exercise we will use automation tooling to create Project namespaces for our `CI/CD` tooling along with the `dev` and `test` namespaces for our deployments to live. We do this to manually using the OpenShift CLI; but as we go from cluster to cluster or project to project Dev and Ops teams often find themselves having to redo these tasks again and again. Configuring our cluster using code; we can easily store this in Git and repeat the process again and again. By minimising the time taken to do these repetitive tasks we can accelerate our ability to deliver value to our customers; working on the hard problems they face. |
|---|
| | | In this exercise we will use automation tooling to create Project namespaces for our `CI/CD` tooling along with the `dev` and `test` namespaces for our deployments to live. We do this manually using the OpenShift CLI; but as we go from cluster to cluster or project to project Dev and Ops teams often find themselves having to redo these tasks again and again. Configuring our cluster using code; we can easily store this in Git and repeat the process again and again. By minimising the time taken to do these repetitive tasks we can accelerate our ability to deliver value to our customers; working on the hard problems they face. |
|---|
| | | |
|---|
| | | This exercise uses Ansible to drive the creation of the cluster content. In particular; we'll use a play book called the `OpenShift Applier`. Once the project namespace have been created; we will add some tools to support CI/CD such as Jenkins, Git and Nexus. These tools will be needed by later lessons to automate the build and deploy of our apps. Again; we will use OpenShift Templates and drive their creation in the cluster using Ansible. To prove things are working, finally we'll delete all our content and re-apply the inventory to re-create our clusters content. |
|---|
| | | This exercise uses Ansible to drive the creation of the cluster content. In particular; we'll use a play book called the `OpenShift Applier`. Once the project namespace have been created; we will add some tools to support CI/CD such as Jenkins, Git and Nexus. These tools will be needed by later lessons to automate the build and deploy of our apps. Again; we will use OpenShift Templates and drive their creation in the cluster using Ansible. To prove things are working, finally we'll delete all our content and re-apply the inventory to re-create our cluster's content. |
|---|
| | | |
|---|
| | | #### Why is config-as-code important? |
|---|
| | | * Assurance - Prevents unwanted config changes from people making arbitrary changes to environments. No more Snowflake servers! |
|---|
| | |
|---|
| | | ``` |
|---|
| | | where the `-e target=bootstrap` is passing an additional variable specifying that we run the `bootstrap` inventory |
|---|
| | | |
|---|
| | | 3. Once successful you should see an output similar to this (Cow's not included):  |
|---|
| | | 3. Once successful you should see an output similar to this (Cows not included):  |
|---|
| | | |
|---|
| | | 3. You can check to see the projects have been created successfully by running |
|---|
| | | ```bash |
|---|
| | |
|---|
| | | 4. Once logged in create a new project called `enablement-ci-cd` and mark it as internal. Once created; copy out the `git url` for use on the next step. |
|---|
| | |  |
|---|
| | | <p class="tip"> |
|---|
| | | Note - we would not normally make the project under your name but create an group and add the project there on residency but for simplicity of the exercise we'll do that here |
|---|
| | | Note - we would not normally make the project under your name but create a group and add the project there on residency but for simplicity of the exercise we'll do that here |
|---|
| | | </p> |
|---|
| | | |
|---|
| | | 4. If you have not used Git before; you may need to tell Git who you are and what your email is before we commit. Run the following commands, substitution your email and "Your Name". If you've done this before move on to the next step. |
|---|
| | | 4. If you have not used Git before; you may need to tell Git who you are and what your email is before we commit. Run the following commands, substituting your email and "Your Name". If you've done this before move on to the next step. |
|---|
| | | ```bash |
|---|
| | | git config --global user.email "yourname@mail.com" |
|---|
| | | ``` |
|---|
| | |
|---|
| | | SOURCE_REPOSITORY_PASSWORD=<YOUR_LDAP_PASSWORD> |
|---|
| | | ``` |
|---|
| | | where |
|---|
| | | * `<GIT_URL>` is the full path clone path of the repo where this project is stored (including the https && .git) |
|---|
| | | * `<GIT_URL>` is the full clone path of the repo where this project is stored (including the https && .git) |
|---|
| | | * `<YOUR_NAME>` is the prefix for your `-ci-cd` project. |
|---|
| | | * Explore some of the other parameters in `templates/jenkins-s2i.yml` |
|---|
| | | * `<YOUR_LDAP_USERNAME>` is the username builder pod will use to login and clone the repo with |
|---|
| | |
|---|
| | |  |
|---|
| | | |
|---|
| | | ## Exercise Intro |
|---|
| | | This lesson is focused on creating a pipeline for our application. What is a pipeline? A pipeline is a series of steps or stages that takes our code from source to a deployed application. There can be many stages to a pipeline but a simple flow is to run a `build > bake > deploy`. Usually the first stage is trigger by something like a git commit. There could be many steps in each of these stages; such as compiling code, running tests and linting. All of these are done to try and drive up code quality and give more assurance that what is deployed is behaving as expected. In the exercise we will create Jenkins pipeline by configuring it through the UI, this will create an un-gated pathway to production |
|---|
| | | This lesson is focused on creating a pipeline for our application. What is a pipeline? A pipeline is a series of steps or stages that takes our code from source to a deployed application. There can be many stages to a pipeline but a simple flow is to run a `build > bake > deploy`. Usually the first stage is triggered by something like a git commit. There could be many steps in each of these stages; such as compiling code, running tests and linting. All of these are done to try and drive up code quality and give more assurance that what is deployed is behaving as expected. In the exercise we will create Jenkins pipeline by configuring it through the UI, this will create an un-gated pathway to production |
|---|
| | | |
|---|
| | | First we will explore the sample application and get it running locally. The sample app is a `todolist` app - the `Hello World` app of the modern day. |
|---|
| | | |
|---|
| | |
|---|
| | | ## 10,000 Ft View |
|---|
| | | > _This lab requires users to take the sample TODO app and create a build pipeline in Jenkins by clicking your way to success ending up with an app deployed to each of the namespaces created previously_ |
|---|
| | | |
|---|
| | | 2. Import the projects into your gitlab instance. See README of each for build instructions |
|---|
| | | 2. Import the projects into your gitlab instance. See the README of each for build instructions |
|---|
| | | |
|---|
| | | 2. Deploy a `MongoDB` using the provided template to all project namespace. |
|---|
| | | |
|---|
| | |
|---|
| | | </p> |
|---|
| | |  |
|---|
| | | |
|---|
| | | 2. The `todolist-fe` has a package.json at the root of the project, this defines some configuration for the app including its dependencies, dev dependencies, scripts and other configuration. Install the apps dependencies |
|---|
| | | 2. The `todolist-fe` has a package.json at the root of the project, this defines some configuration for the app including its dependencies, dev dependencies, scripts and other configuration. Install the app's dependencies |
|---|
| | | ```bash |
|---|
| | | npm install |
|---|
| | | ``` |
|---|
| | |
|---|
| | | }, |
|---|
| | | ``` |
|---|
| | | |
|---|
| | | 2. To run the application; start a new instance of the MongoDB by running the following. This will pull a mongodb image from Dockerhub and then start it for our API to connect to. |
|---|
| | | 2. To run the application; start a new instance of MongoDB by running the following. This will pull a mongodb image from Dockerhub and then start it for our API to connect to. |
|---|
| | | ```bash |
|---|
| | | npm run mongo |
|---|
| | | ``` |
|---|
| | |
|---|
| | | |
|---|
| | | 5. Name this job `dev-todolist-fe-build` and select `Freestyle Project`. All our jobs will take the form of `<ENV>-<APP_NAME>-<JOB_PURPOSE>`.  |
|---|
| | | |
|---|
| | | 5. The page that loads is the Job Configuration page and it can be returned to at anytime from Jenkins. Let's start configuring our job. To conserve space; we will make sure Jenkins only keeps the last builds artifacts. Tick the `Discard old builds` checkbox, then `Advanced` and set `Max # of builds to keep with artifacts` to 1 as indicated below |
|---|
| | | 5. The page that loads is the Job Configuration page and it can be returned to at anytime from Jenkins. Let's start configuring our job. To conserve space; we will make sure Jenkins only keeps the last build's artifacts. Tick the `Discard old builds` checkbox, then `Advanced` and set `Max # of builds to keep with artifacts` to 1 as indicated below |
|---|
| | |  |
|---|
| | | |
|---|
| | | 5. Our NodeJS build needs to be run on the `jenkins-slave-npm` we bought in in the previous chapter. Specify this in the box labelled `Restrict where this project can be run`  |
|---|
| | |
|---|
| | | 5. Back on Jenkins; We can tie all the jobs in the pipeline together into a nice single view using the Build Pipeline view. Back on the Jenkins home screen Click the + beside the all tab on the top. |
|---|
| | |  |
|---|
| | | |
|---|
| | | 5. On the view that loads; Give the new view a sensible name like `dev-todolist-fe-pipeline` and select Build Pipeline |
|---|
| | | 5. On the view that loads; Give the new view a sensible name like `dev-todolist-fe-pipeline` and select Build Pipeline View |
|---|
| | |  |
|---|
| | | |
|---|
| | | 5. Set the Pipeline Flow's Inital Job to `dev-todolist-fe-build` and save. |
|---|
| | |
|---|
| | | NOTE - This section is optional! Git webhooks are useful but not needed for Enablement completion. |
|---|
| | | </p> |
|---|
| | | |
|---|
| | | 7. In order to allow GitLab trigger Jenkins (because of the OpenShift Auth Plugin), we need to allow the `Anonymous` user trigger builds. Head to your Jenkins Dashboard and click on `Manage Jenkins` on the left hand side. Then scroll down and click `Configure Global Security`. Alternatively, type in `https://jenkins-<YOUR_NAME>-ci-cd.apps.some.domain.com/configureSecurity/` . You should see a screen like so: |
|---|
| | | 7. In order to allow GitLab to trigger Jenkins (because of the OpenShift Auth Plugin), we need to allow the `Anonymous` user triggered builds. Head to your Jenkins Dashboard and click on `Manage Jenkins` on the left hand side. Then scroll down and click `Configure Global Security`. Alternatively, type in `https://jenkins-<YOUR_NAME>-ci-cd.apps.some.domain.com/configureSecurity/` . You should see a screen like so: |
|---|
| | |  |
|---|
| | | |
|---|
| | | 7. Scroll down to the `Authorization` section and allow `Anonymous` to create jobs. Do this by navigating through the matrix of checkboxes and check `Build` and `Cancel` under the Job heading. Leave all other user behaviour as is. Anonymous is the user that GitLab will act as so this allows the WebHook to trigger builds. (The screenshot has been cropped to bring Job further to the left.) Hit `Save` or `Apply`. |
|---|
| | |
|---|
| | | ### The TDD Cycle |
|---|
| | | |
|---|
| | | 1. `Write a test` - |
|---|
| | | In TDD a new feature begins by writing a test. Write a test that clearly defines a function or one that provides an improvement to an existing function. It's important the developer clearly understands the features specification and requirements, or the feature could be wrong from the get-go. |
|---|
| | | In TDD a new feature begins by writing a test. Write a test that clearly defines a function or one that provides an improvement to an existing function. It's important the developer clearly understands the feature's specification and requirements, or the feature could be wrong from the get-go. |
|---|
| | | |
|---|
| | | 2. `Test Fails` - |
|---|
| | | When a test is first implemented it is expected to fail. This failure validates the test is working correctly as the feature is yet to be implemented. |
|---|
| | |
|---|
| | | #### 2b - Create todolist-fe tests |
|---|
| | | > Using [Jest](https://facebook.github.io/jest/) as our test runner and the `vue-test-utils` library for managing our vue components; we will now write some tests for front end functionality to persist our important-flag. The changes required to the front end are quite large but we will use TDD to create our test first, then implement the functionality. |
|---|
| | | |
|---|
| | | Our TodoList App uses `vuex` to manage the state of the apps' todos and `axios` HTTP library to connect to the backend. `Vuex` is an opinionated framework for managing application state and has some key design features you will need to know to continue with the exercise. |
|---|
| | | Our TodoList App uses `vuex` to manage the state of the app's todos and `axios` HTTP library to connect to the backend. `Vuex` is an opinionated framework for managing application state and has some key design features you will need to know to continue with the exercise. |
|---|
| | | |
|---|
| | | In `vuex` the application state is managed by a `store`. The `store` houses all the todos we have retrieved from the backend as well as the `getter` methods for our array of `todos`. In order to make changes to the store, we could call the store directly and update each todo item but as earlier said; vuex is an opinionated module with its own way of updating the store. It is bad practice to call the store directly. |
|---|
| | | |
|---|
| | | There are two parts of the lifecycle to updating the store, the `actions` & `mutations`. When the user clicks a todo to mark it as complete; the `actions` are called. An action could involve a call to the backend or some pre-processing of the data. Once this is done, the change is committed to the store by calling the `mutation` function. A store should only ever be manipulated through a mutation function. Calling the mutation will then update the todo object in the apps local store for rendering in the view. |
|---|
| | | There are two parts of the lifecycle to updating the store, the `actions` & `mutations`. When the user clicks a todo to mark it as complete; the `actions` are called. An action could involve a call to the backend or some pre-processing of the data. Once this is done, the change is committed to the store by calling the `mutation` function. A store should only ever be manipulated through a mutation function. Calling the mutation will then update the todo object in the app's local store for rendering in the view. |
|---|
| | | |
|---|
| | | For example; when marking a todo as done in the UI, the following flow occurs |
|---|
| | | * The `TodoItem.vue` calls the `markTodoDone()` function which dispatches an event to the store. |
|---|
| | |
|---|
| | | * The `<script></script>` contains the JavaScript of our component and is essentially the logic for our component. It defines things like `properties`, `methods` and other `components` |
|---|
| | | * The `<style></style>` contains the encapsulated CSS of our component |
|---|
| | | |
|---|
| | | 3. Underneath the `</md-list-item>` tag, let's add a new md-button. Add a `.important-flag` class on the `md-button` and put the svg of the flag provided inside it. |
|---|
| | | 3. Underneath the `</md-list-item>` tag, let's add a new md-button. Add an `.important-flag` class on the `md-button` and put the svg of the flag provided inside it. |
|---|
| | | ```html |
|---|
| | | </md-list-item> |
|---|
| | | <!-- TODO - SVG for use in Exercise3 --> |
|---|
| | |
|---|
| | | </md-button> |
|---|
| | | ``` |
|---|
| | | |
|---|
| | | 3. More tests should now be passing. Let's wire the click of the flag to an event in Javascript. In the methods section of the `<script></script>` tags in the Vue file, implement the `markImportant()`. We want to wire this to the action to updateTodo, just like we have in the `markCompleted()` call above it. We also need to pass and additional property to this method call `important` |
|---|
| | | 3. More tests should now be passing. Let's wire the click of the flag to an event in Javascript. In the methods section of the `<script></script>` tags in the Vue file, implement the `markImportant()`. We want to wire this to the action to updateTodo, just like we have in the `markCompleted()` call above it. We also need to pass an additional property to this method called `important` |
|---|
| | | ```javascript |
|---|
| | | markImportant() { |
|---|
| | | // TODO - FILL THIS OUT IN THE EXERCISE |
|---|
| | |
|---|
| | | }, |
|---|
| | | ``` |
|---|
| | | |
|---|
| | | 3. Let's connect the click button in the DOM to the Javascript function we've just created. In the template, add a click handler to the md-button to call the function `markImportant()` by adding ` @click="markImportant()"` to the `<md-button> tag |
|---|
| | | 3. Let's connect the click button in the DOM to the Javascript function we've just created. In the template, add a click handler to the md-button to call the function `markImportant()` by adding ` @click="markImportant()"` to the `<md-button>` tag |
|---|
| | | ```html |
|---|
| | | <!-- TODO - SVG for use in Exercise3 --> |
|---|
| | | <md-button class="important-flag" @click="markImportant()"> |
|---|
| | |
|---|
| | | } |
|---|
| | | ``` |
|---|
| | | |
|---|
| | | 3. Finally, let's implement the `mutation` for our feature. Again, starting with the tests..... Open the `tests/unit/javascript/mutations.spec.js` to find our skeleton tests at the bottom of the file. Our mutation method is responsible for toggling the todo's `important` property between `true` and `false`. Let's implement the tests for this functionality by setting important to be true and calling the method expecting the inverse. Then let's set it to false and call the method expecting the inverse. Add the expectations below the `// TODO - test goes here!` comment as done previously. |
|---|
| | | 3. Finally, let's implement the `mutation` for our feature. Again, starting with the tests... Open the `tests/unit/javascript/mutations.spec.js` to find our skeleton tests at the bottom of the file. Our mutation method is responsible for toggling the todo's `important` property between `true` and `false`. Let's implement the tests for this functionality by setting important to be true and calling the method expecting the inverse. Then let's set it to false and call the method expecting the inverse. Add the expectations below the `// TODO - test goes here!` comment as done previously. |
|---|
| | | ```javascript |
|---|
| | | it("it should MARK_TODO_IMPORTANT as false", () => { |
|---|
| | | state.todos = importantTodos; |
|---|
| | |
|---|
| | | |
|---|
| | | #### 2c - Create todolist e2e tests |
|---|
| | | |
|---|
| | | 3. TODO !! |
|---|
| | | > Using [Nightwatch.js](http://nightwatchjs.org/) We will write a reasonably simple e2e test to test the functionality of the feature we just implemented. |
|---|
| | | |
|---|
| | | 3. Firstly we need to create an e2e spec test file in the correct place. |
|---|
| | | |
|---|
| | | ```bash |
|---|
| | | touch tests/e2e/specs/importantFlag.js |
|---|
| | | ``` |
|---|
| | | |
|---|
| | | 3. Open this new file in your code editor and set out the initial blank template for an e2e test as below: |
|---|
| | |  |
|---|
| | | |
|---|
| | | 3. Now get the test to access the todos page and wait for it to load. The url can be taken from `process.env.VUE_DEV_SERVER_URL` |
|---|
| | |  |
|---|
| | | |
|---|
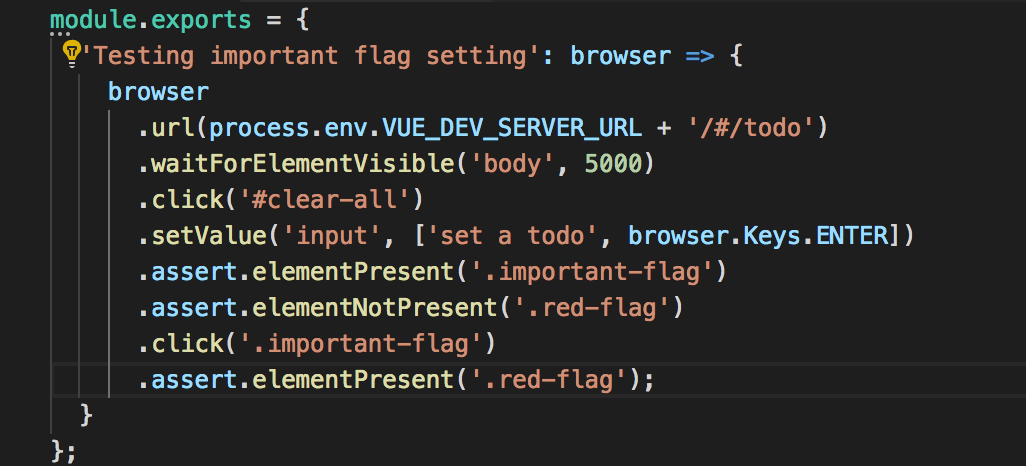
| | | 3. Now click the clear all button and then enter a value in the textbox to create a new item. We clear all first to ensure we start with a fresh list. We now do our first assertion: that a 'important flag' exists (the button to set important), and also that a red flag does not exist. You will quickly find there is no way to reference the clear all button. We will therefore have to go to `src/components/XofYItems.vue` and add `id="clear-all"` to the clear all button. |
|---|
| | |  |
|---|
| | |  |
|---|
| | | |
|---|
| | | 3. We should now get nightwatch to click the flag and check whether the flag has turned red. |
|---|
| | |  |
|---|
| | | |
|---|
| | | 3. At this point we should have a working e2e test. We can run this by using `npm run e2e`. When satisfied we can push up these changes. |
|---|
| | | |
|---|
| | | ```bash |
|---|
| | | git add . |
|---|
| | | ``` |
|---|
| | | |
|---|
| | | ```bash |
|---|
| | | git commit -m "Implementing e2e tests" |
|---|
| | | ``` |
|---|
| | | |
|---|
| | | ```bash |
|---|
| | | git push |
|---|
| | | ``` |
|---|
| | | |
|---|
| | | --- |
|---|
| | | |
|---|
| | |
|---|
| | | ## 10,000 Ft View |
|---|
| | | > The goal of this exercise is to move to using the Jenkinsfile in the todolist-api and todolist-fe projects. Additionally we will create new slaves for use in the next exercise. |
|---|
| | | |
|---|
| | | 2. On Jenkins; create a multibranch pipeline project to scan the GitLab endpoint for each app. Use the Jenkinsfile provided to run the stages. Replace the `<YOUR_NAME>` with appropriate variable. |
|---|
| | | 2. On Jenkins; create a multibranch pipeline project to scan the GitLab endpoint for each app. Use the Jenkinsfile provided to run the stages. Replace `<YOUR_NAME>` with the appropriate variable. |
|---|
| | | |
|---|
| | | 2. Create two new Jenkins slaves for the `OWASP ZAP` scanner and the `Arachni` WebCrawler |
|---|
| | | |
|---|
| | |
|---|
| | | * `stage {}` all jobs must have one stage. This is the logical part of the build that will be executed e.g. `bake-image` |
|---|
| | | * `steps {}` each `stage` has one or more steps involved. These could be execute shell or git checkout etc. |
|---|
| | | * `agent {}` specifies the node the build should be run on e.g. `jenkins-slave-npm` |
|---|
| | | * `post {}` hook is used to specify the post-build-actions. Jenkins declarative provides very useful callbacks for `success`, `failure` and `always` which are useful for controlling the job flow |
|---|
| | | * `when {}` is used for flow control. It can be used at stage level and be used to stop pipeline entering that stage. e.g. when branch is master; deploy to `test` environment. |
|---|
| | | * `post {}` hook is used to specify the post-build-actions. Jenkins declarative pipeline syntax provides very useful callbacks for `success`, `failure` and `always` which are useful for controlling the job flow |
|---|
| | | * `when {}` is used for flow control. It can be used at the stage level and be used to stop pipeline entering that stage. e.g. when branch is master; deploy to `test` environment. |
|---|
| | | |
|---|
| | | 2. The Jenkinsfile is mostly complete to do all the testing etc that was done in previous exercises. Some minor changes will be needed to orchestrate namespaces. Find and replace all instances of `<YOUR_NAME>` in the Jenkinsfile. Update the `<GIT_USERNAME>` to the one you login to the cluster with; this variable is used in the namespace of your git projects when checking out code etc. Ensure the `GITLAB_DOMAIN` matches your git host. |
|---|
| | | ```groovy |
|---|
| | |
|---|
| | | 2. Set the `Scan Multibranch Pipeline Triggers` to be periodic and the interval to 1 minute. This will poll the GitLab instance for new branches or change sets to build. |
|---|
| | |  |
|---|
| | | |
|---|
| | | 2. Save the Job configuration to run the intial scan. The log will show scans for `master` and `develop` branch which have no `Jenkinsfile` so are skipped. The resulting view will show the `feature/jenkinsfile` job corresponding the only branch that currently has one. The build should run automatically. |
|---|
| | | 2. Save the Job configuration to run the intial scan. The log will show scans for `master` and `develop` branches, which have no `Jenkinsfile` so are skipped. The resulting view will show the `feature/jenkinsfile` job corresponding the only branch that currently has one. The build should run automatically. |
|---|
| | |  |
|---|
| | | |
|---|
| | | 2. The pipeline file is setup to only run `bake` & `deploy` stages when on `master` or `develop` branch. This is to provide us with very fast feedback for team members working on feature or bug fix branches. Each time someone commits or creates a new branch a basic build with testing occurs to give very rapid feedback to the team. Let's now update our `master` and `develop` branches to include the Jenkinsfile and delete the feature branch. |
|---|
| | |
|---|
| | | - Add the multi-branch configuration to the S2I to have Jenkins come alive with the `todolist-api` and `-fe` configuration cooked into it for future uses. |
|---|
| | | |
|---|
| | | Jenkins Pipeline Extension |
|---|
| | | - Add an extension to the pipeline that promotes code to UAT environment once the master job has been successful. |
|---|
| | | - Add an extension to the pipeline that promotes code to the UAT environment once the master job has been successful. |
|---|
| | | - Use a WAIT to allow for manual input to approve the promotion |
|---|
| | | |
|---|
| | | Jenkins e2e extension (blue/green) |
|---|
| | |
|---|
| | | |
|---|
| | | There are many tools out there for supporting these testing types but often they are left to the end of a delivery. Many traditional projects will leave Performance testing or security sign off to a few weeks before Go Live. This raises the question of what do we do if things do not pass these tests? Do we hold off the Go Live or accept the risk? In most cases we can learn earlier if things will be show stoppers and more importantly we can automate them. |
|---|
| | | |
|---|
| | | For example; imagine a developer called `Sam` has checked in some poor performing function into an API that spikes its response time. Let's call this `Sam Code`. This `Sam Code` may not be caught by our Unit Tests but could have very big impact on application usability. Before building code on top this and it becoming more of an issue at the end of a project; we could code and capture metrics around API response time and track these over time and hopefully spot regressions earlier. |
|---|
| | | For example; imagine a developer called `Sam` has checked in some poorly performing function into an API that spikes its response time. Let's call this `Sam Code`. This `Sam Code` may not be caught by our Unit Tests but could have very big impact on application usability. Before building code on top this and it becoming more of an issue at the end of a project; we could code and capture metrics around API response time and track these over time and hopefully spot regressions earlier. |
|---|
| | | |
|---|
| | | Another one of the age old questions is "How do we know we're testing enough?". Well the simple answer is you can never do enough testing! But how do we know we are testing the right things? Code coverage metrics can be run on our application while running the tests. They can identify what files are being tested and a line by line of how many times a test executes against a block of code. Reporting these metrics in our pipeline gives a greater handle on the quality of our testing. |
|---|
| | | |
|---|
| | |
|---|
| | | |
|---|
| | | 2. Open the `todolist-fe` application's `Jenkinsfile` in your favourite editor. The file is stored in the root of the project. |
|---|
| | | |
|---|
| | | 2. The file is layed out with a collection of stages that correspond to each part of our build as seen below. We will create a new stage to execute in parallel. |
|---|
| | | 2. The file is laid out with a collection of stages that correspond to each part of our build as seen below. We will create a new stage to execute in parallel. |
|---|
| | |  |
|---|
| | | |
|---|
| | | 2. Create a new Parallel Stage called `security scanning` underneath the `stage("e2e test") { }` section as shown below. The contents of the `e2e test` have been removed for simplicity. |
|---|
| | |
|---|
| | | } |
|---|
| | | ``` |
|---|
| | | |
|---|
| | | 2. Finally add the reporting for Jenkins in `post` hook of our Declarative Pipeline. This is to report the findings of the scan in Jenkins as a HTML report. |
|---|
| | | 2. Finally add the reporting for Jenkins in `post` hook of our Declarative Pipeline. This is to report the findings of the scan in Jenkins as an HTML report. |
|---|
| | | ```groovy |
|---|
| | | stage('OWASP Scan') { |
|---|
| | | agent { |
|---|
| | |
|---|
| | | _____ |
|---|
| | | |
|---|
| | | ## 10,000 Ft View |
|---|
| | | > The goal of this exercise is to introduce Build Monitors to radiate teams progress on Dashboards. |
|---|
| | | > The goal of this exercise is to introduce Build Monitors to radiate team's progress on Dashboards. |
|---|
| | | |
|---|
| | | 2. Create a new Dashboard for our Builds using the plugin above. Use Regex to add jobs to it. Use the BuildFail Analyser to add meaningful data to the reason for failures. |
|---|
| | | |
|---|
| | |
|---|
| | | 2. Check the box to use Regular Expression and set the value to be something that should scrape our apps such as `.*todolist.*` |
|---|
| | |  |
|---|
| | | |
|---|
| | | 2. Finally; select `Display committers` and set the Failure Analyser to `Description`. This allows us to write regex for when fails occur in Jenkins and have the reasons plotted on the graph. For example; number of test scores or common compilation errors. |
|---|
| | | 2. Finally; select `Display committers` and set the Failure Analyser to `Description`. This allows us to write regexes for when failures occur in Jenkins and have the reasons plotted on the graph. For example; number of test scores or common compilation errors. |
|---|
| | |  |
|---|
| | | |
|---|
| | | 2. Save your configuration to see your Build Monitor! |
|---|
| | |
|---|
| | | ``` |
|---|
| | |  |
|---|
| | | |
|---|
| | | 2. We can save up these regex and inject them into the `jenkins-s2i` so the configuration is there the next time we launch and we don't have to code them up again. In `enablement-ci-cd` repo; the `jenkins-s2i/configuration/build-failure-analyzer.xml` already contains ones we've collected on previous residencies. |
|---|
| | | 2. We can save up these regexes and inject them into the `jenkins-s2i` so the configuration is there the next time we launch and we don't have to code them up again. In `enablement-ci-cd` repo; the `jenkins-s2i/configuration/build-failure-analyzer.xml` already contains ones we've collected on previous residencies. |
|---|
| | | |
|---|
| | | ### Part 3 - Seed Jenkins Dashboards |
|---|
| | | > _TODO - Add instructions for creating dashboards as part of s2i in Jenkins setup using DSL_ |
|---|
| | |
|---|
| | | |
|---|
| | |  |
|---|
| | | |
|---|
| | | This is a collection of practices and exercises to take a learner through a four day simulated residency experience. Learners can expect to be exposed to labs practices such as [Event Storming](https://rht-labs.github.io/practice-library/practices/event-storming/), [Social Contract](https://rht-labs.github.io/practice-library/practices/social-contract/) and [Impact Mapping](https://rht-labs.github.io/practice-library/practices/impact-mapping/) amoung many more which can be found in our [Practice Library](https://rht-labs.github.io/practice-library/). Learners will also be exposed to `Labs CI/CD` - how we use OpenShift & Ansible in conjunction with Jenkins to automate build and deploy of a sample todolist application and its required infrastructure. |
|---|
| | | This is a collection of practices and exercises to take a learner through a four day simulated residency experience. Learners can expect to be exposed to labs practices such as [Event Storming](https://rht-labs.github.io/practice-library/practices/event-storming/), [Social Contract](https://rht-labs.github.io/practice-library/practices/social-contract/) and [Impact Mapping](https://rht-labs.github.io/practice-library/practices/impact-mapping/) among many more which can be found in our [Practice Library](https://rht-labs.github.io/practice-library/). Learners will also be exposed to `Labs CI/CD` - how we use OpenShift & Ansible in conjunction with Jenkins to automate build and deploy of a sample todolist application and its required infrastructure. |
|---|
| | | |
|---|
| | | ## Learner pre-requisites |
|---|
| | | - OCP CLI v3.9 |
|---|
| | | - Ansible v2.5 |
|---|
| | | - NodeJS v8.x |
|---|
| | | - Git Installed |
|---|
| | | - Google Chrome Web Browser (>59) |
|---|
| | | - Docker latest |
|---|
| | | - JDK v8 |
|---|
| | | - Access to an OpenShift cluster `oc login -u <username> -p <password> <cluster_url>` |
|---|
| | | - Text editor such as Atom, IntelliJ or Visual Studio Code (The exercise were created using VSCode, so the screenshots will match its layout and colour schemes) |
|---|
| | | | Software | Version | Check | |
|---|
| | | | -------- | ------- | ----- | |
|---|
| | | | OCP CLI | v3.9 | $ oc version | grep -i --color oc <br><span style="color:red">oc </span> v3.9.0+191fece | |
|---|
| | | | Ansible | v2.5 | $ ansible --version | grep -i --color ansible <br> <span style="color:red">ansible</span> 2.5.5 <br> .... <br>| |
|---|
| | | | NodeJS | v8.x | $ node -v <br> v8.11.3| |
|---|
| | | | Git Installed | | $ git --version <br> git version 2.17.1| |
|---|
| | | | Google Chrome Web Browser | (>59) | click [here](chrome://version/) if Google Chrome is your default browser else copy the link `chrome://version/` in your Chome | |
|---|
| | | | Docker latest | Community Edition - Edge | $ docker --version <br> Docker version 18.05.0-ce, build f150324| |
|---|
| | | | JDK | v8 | $ java -version <br>java version "1.8.0_131"<br>Java(TM) SE Runtime Environment (build 1.8.0_131-b11)<br>Java HotSpot(TM) 64-Bit Server VM (build 25.131-b11, mixed mode)| |
|---|
| | | | Access to an OpenShift cluster | | `oc login -u <username> -p <password> <cluster_url>` | |
|---|
| | | | Text editor such as Atom, IntelliJ or Visual Studio Code <br><br> (The exercises were created using `VSCode`, so the screenshots will match its layout and colour schemes) | - | - | |
|---|
| | | |
|---|
| | | |
|---|
| | | > (TODO) Download the tools-container containing required Ansible and OpenShift tooling pre-installed |
|---|
| | | |
|---|
| | | ______ |
|---|
| | | |
|---|
| | | ## Setup your IDE |
|---|
| | | If you are using VSCode; some handy plugins that will make the lessons easier are: |
|---|
| | |
|---|
| | | * Think about capturing the Enablement by bringing, for example, GoPro Camera, 360 cameera, etc. |
|---|
| | | * Monitors for pairing if not provided by the venue |
|---|
| | | * Download all videos used in the training incase of WiFi connectivity issues |
|---|
| | | * Order some Swag from Marketing - great for everyone to take something away and it also provides an opportunity to boost Team Identity and get a great photo with everyone in, for example, their new t-shirt! |
|---|
| | | |
|---|
| | | |
|---|
| | | ## Setting up the Room |
|---|
| | |
|---|
| | | * Labs is…. |
|---|
| | | * Space for Faces |
|---|
| | | * Space for Animals |
|---|
| | | * End of Day 2 Retrospective canvas (one for each table group) |
|---|
| | | * End of Day 3 Retrospective canvas (one for the whole group) |
|---|
| | | * A location for catering to be delivered to and consumed from |
|---|
| | | We strongly recommend using the full day before the Enablement to set the room up as you expect it to be used during the 4 days (including putting up all the "Big Picture" and "Practice Corner" as you expect it to be on day 4). Not only does this help familiarise further with the material but it will also test the space considerations. |
|---|
| | | We then "re-set" the space to start the Enablement with just a circle of chairs. This facilitates a great collaborative start and also provide the opportunities for the newly formed teams to configure their space themselves. |
|---|
| | | |
|---|
| | | |
|---|
| | | Think about the wall space that will be used for: |
|---|
| | | * Team's Social Contract |
|---|
| | |
|---|
| | | * End of Day Retros |
|---|
| | | * Pairing and mob faces |
|---|
| | | * Andon Chord or Real Bell / Buzzer if available |
|---|
| | | * The example linkage for ToDoIst: Impact Map -> Event Storm -> Value Slices -> Initial Product Backlog -> Sprint 1 Board (done) -> Updated Product Backlog -> Sprint 2 Board (which is the focus on Exercise 3) |
|---|
| | | |
|---|
| | | |
|---|
| | | ## Facilitation Guidelines |
|---|
| | | |
|---|
| | | * Facilitation Guides have been prepared for each of the exercises (technical and non-technical). These are intended to be living and breathing documents which will be updated as more Enablement sessions are run. |
|---|
| | | * Slideware includes lots of real world residency examples of practices being taught. It is expected that these examples will change session-by-session and the Labs facilitators will inject their own stories, photos and videos in here. |
|---|
| | | * Catering is an important factor to consider. Having group breakfasts and lunch emulates what we do on Residencies |
|---|
| | | * Having a group social during the week is also an important aspect of the Enablement |
|---|
| | | * Catering is an important factor to consider. Having group breakfasts and lunch emulates what we do on Residencies and provides additional time to bond, network, form teams, relax and have fun / chill-out time |
|---|
| | | * Having a group social during the week is also an important aspect of the Enablement and representative of what we try to do during Residencies. Provides similar impact to point above and helps drive team culture. |
|---|
| | | * It is strongly recommended to plan for classes of up to 24 people. This will require an "overall facilitator" (to focus on opening / closing the workshop and each day) and one "technical facilitator" (people who can trouble-shoot technical issues and are very familiar with the technical exercises) for every 12 participants. So, a full group of 24 participants would need 1 overall facilitator and 2 technical facilitators. The facilitation of this is intense and demanding and required 100% focus during the week. |
|---|
| | | * For growing the facilitation pool, we strongly recommend a three stage approach |
|---|
| | | * Attend and complete the Enablement in full as a participant |
|---|
| | | * Attend a subsequent Enablement again but shadow the Facilitator team with some opportunities to present |
|---|
| | | * Be a primary facilitator on a subsequent Enablement |
|---|
| | | * Each day should include a "walk the walls" exercise to introduce and re-visit 1) The Product Backlog/Burndwon; 2) The Big Picture; and 3) The Practice Corner. We often start each morning with this and allow as much time as possible for discussion, questions and to kick-start the day with collaboration |
|---|
| | | * We like to include a thought-inspiring YouTube video each day. They are nice to play first thing (before the Walk the Walls) as people come in and are having coffee. Equally, they are good to be used as time dividers, breaking up long exercises, just after lunch, etc. Videos that have beeen used to date include: |
|---|
| | | * [Henrik Kniberg's Product Ownership in a Nutshell](https://youtu.be/502ILHjX9EE) |
|---|
| | | * [Drive: The surprising truth about what motivates us](https://youtu.be/u6XAPnuFjJc) |
|---|
| | | * [Django explaining DevOps in a Bath](https://youtu.be/Qj09XRhp0lA) |
|---|
| | | * ["Greatness" by David Marquet](https://youtu.be/OqmdLcyES_Q) |
|---|
| | | * We like to play some fun games / energisers during the four days. It helps drive fun and team culture as well as keep enegery levels up (especially useful during the longer technical exercises). Activities we have used include: |
|---|
| | | * [Human Rock Paper Scissors](http://www.funretrospectives.com/human-rock-paper-scissors/) |
|---|
| | | * [Collaborative Face Drawing](http://www.funretrospectives.com/collaborative-face-drawing/) |
|---|
| | | * Add a channel to the [Enablement Slack Group](labsenablement.slack.com) specifically for your session and add all participants and facilitators. This is great for promoting discussion before, during and after the workshop. |
|---|
| | |
|---|
| | | |
|---|
| | | ## Facilitation Materials Needed |
|---|
| | | |
|---|
| | | * Teams in table size of 4 to 6 |
|---|
| | | * Sticky Notes - rectangular size on each table |
|---|
| | | * Sharpie Pens (1 per person) on each table |
|---|
| | | * Start session with the whole group in a big circle |
|---|
| | | * Group should be near the information radiators used during the session (Backlog, Big Picture, Realtime reto, etc.) |
|---|
| | | * Sticky Notes - one large (A5) sticky note on each chair (for Faces) and one smaller rectangular sticky note (for Animals) on each chair. One small square Red sticky and one small square Green sticky (for mood marbles) on each chair |
|---|
| | | * Sharpie Pens - one on each chair |
|---|
| | | |
|---|
| | | |
|---|
| | | |
|---|
| | | ## Facilitation Guidelines |
|---|
| | | |
|---|
| | | * Presentation of the slides |
|---|
| | | * Early ice breaker activity (provided in slides) |
|---|
| | | * Play the [Collaborative Face Drawaing](http://www.funretrospectives.com/collaborative-face-drawing/) energizer |
|---|
| | | * Present slides which sign posts to all the introductions to make |
|---|
| | | * Showcase of the room to point to the visual artefacts to be used as a part of running the session (sign posted in slides) |
|---|
| | | * When introducing the Backlog for the 4 days, it's important to note that we almost certainly will not do everything on the backlog. We will also embrace feedback and change and may well add, remove, update, re-order the items on it. This is an important lesson that Backlogs never get done completely! |
|---|
| | | * Round the room for everyone to introduce themselve |
|---|
| | |
|---|
| | | |
|---|
| | | ## Facilitation Materials Needed |
|---|
| | | |
|---|
| | | * Teams in table size of 4 to 6 |
|---|
| | | * Start as one big group. During this sessio, teams will form into groups of 4 to 6 |
|---|
| | | * Sticky Notes - large (A5) sized of different colors |
|---|
| | | * Sharpie Pens (1 per person) on each table |
|---|
| | | * Flip-chart or Magic Whiteboard paper |
|---|
| | |
|---|
| | | * Present the slides to introduce Social Contracting, what it is, why we use it and share some Labs stories |
|---|
| | | * Present the residency examples provided in slides and encourage any Labs people present to talk about their experiences of using the practice |
|---|
| | | * Kick off the interactive exercise: |
|---|
| | | * Get the whole group to self-organise into a straight line in order of technical experience. |
|---|
| | | * Divide the group as evenly as possible (no more than 6 per table) so there is a spread of technical experience in each table |
|---|
| | | * In table groups, take the opportunity to (once again) say hello to each other |
|---|
| | | * Talk about how they want to work with each other this week and capture key behaviours on large sticky notes to form the social contract |
|---|
| | | * Encourage everyone to sign their social contract |
|---|
| | |
|---|
| | | |
|---|
| | | * Early interactive acitivty to get each participant to think and write down what Labs is |
|---|
| | | * Presentation of the slides |
|---|
| | | * Show short Labs promotion video |
|---|
| | | * Show short Labs promotion video |
|---|
| | | * This session may generate lots of questions and kick-start discussions. This is a great opportunity to use the car park / parking lot if you think the answers will naturally emerge during the 4 days. |
|---|
| | |
|---|
| | | * Day 1 - a round the group impact feedback (say one thing that impacted you. Pass the ball; you can only talk if you have the ball. |
|---|
| | | * Day 2 - Individual table retros. Allow teams to feedback against each other's committment to the social contract. Use a stop/start/continue retro to facilitate the conversation. Collect Key points onto group wide retro board. |
|---|
| | | * Day 3 - a do more of / do less of / continue / stop / start retro |
|---|
| | | * Day 4 - a timeline retro |
|---|
| | | * Day 4 - a fist of 5 confidence vote. Facilitator should ask how confident everyone is in jointly delivering and upcoming Labs residency (as per the target outcome of this Enablement). Everyone should simultaneously announce a score of 0-5 using fingers. The same question can be asked as to how much everyone would like to participate in a Labs residency. |
|---|
| | | * Each retrospective should be introduced by one of the facilitators, have a time boxed period for individuals to add their input and a group alignment / discuss to identify clusters / themes and corrective actions |
|---|
| | |
|---|
| | | ## Facilitation Guidelines |
|---|
| | | |
|---|
| | | * Present the slides to introduce Event Storming, what it is, why we use it and walk through the steps in how to use it |
|---|
| | | * Present the residency examples provided in slides and encourage any Labs people present to talk about their experiences of using the practice |
|---|
| | | * Present the residency examples provided in slides and encourage any Labs people present to talk about their experiences of using the practice. We have found presenting a real Event Storm (ideally with the physical board) is much more effective than presenting the slides and has resulted in much better conversation. If you have access to real artefacts, consider reducing the slides. |
|---|
| | | * Kick off the interactive exercise: |
|---|
| | | * As a class, put up the pre-baked Event Storm. The Facilitator should talk through as he/she puts up the events, commands, user, external system, etc. |
|---|
| | |  |
|---|
| | | * Table groups should then replicate the pre-baked event storm artifact and follow the instructions in the slide to extend this to cover additional functionality. Some examples have been given. You could also encourage participants to think about their own experience of to-do-list management |
|---|
| | | * Time box of 20 minutes. Facilitators should walk round the room and help with any questions and engage in conversations |
|---|
| | | * As a class, talk about aggregates and what aggregates might apply to these emerging event storms |
|---|
| | | * |
|---|
| | | * As a class, talk about aggregates and what aggregates might apply to these emerging event storms |
|---|
| | |
|---|
| | | |
|---|
| | | ## Facilitation Materials Needed |
|---|
| | | |
|---|
| | | * Pennies or poker chips (20 for each table) |
|---|
| | | * Flipchart paper - one piece for each table |
|---|
| | | * Marker pens |
|---|
| | | * Teams in table size of 4 to 6 |
|---|
| | | * Sticky Notes - set of the following on each table |
|---|
| | | * Small Rectangular - lots of one color |
|---|
| | |
|---|
| | | |
|---|
| | | ## Facilitation Guidelines |
|---|
| | | |
|---|
| | | * Present the slides to introduce Value Stream Mapping and Metrics Based Process Mapping, what they are and why we use them |
|---|
| | | * Kick off the interactive exercise: |
|---|
| | | * Play the [Penny Flow game](https://www.leanagiletraining.com/better-agile/agile-penny-game-rules/) to introduce the notion of capturing metrics around flow (and the impact batch size has). |
|---|
| | | * Present the slides to introduce Value Stream Mapping and Metrics Based Process Mapping, what they are and why we use them. Show some real world examples and talk through the MBPM before and after as well as the roll-up of metric improvements. |
|---|
| | | * Optiopnnaly, run a further interactive exercise (with the addition of the Penny Flow Game and the feedback before and after including this, this exercise is less valuable): |
|---|
| | | * In pairs, capture all business processes between the trigger of the business requesting a feature and the outcome of that feature running in production and being used |
|---|
| | | * In groups of 12, combine all processes onto a single map |
|---|
| | | * Add some metrics based on traditional software development (with minimal automation) - Process Time, Lead TIme, CAC% |
|---|
| New file |
| | |
|---|
| | | # Pairing and Mobbing |
|---|
| | | |
|---|
| | | > Session to introduce the practices of Mob Learning and Pair Programming, how we use them and show some examples mobbing and pairing in action. This will also include facilitating a short exercise to practice pairing and mobbing in a fun way! We use this session to strongly position pairing as a mechanism for the group completing the technical exercises of this Enablement. This is very important in achieving the target outcome of the Enablement and the Definition of Done. |
|---|
| | | |
|---|
| | | _____ |
|---|
| | | |
|---|
| | | |
|---|
| | | ## Slides |
|---|
| | | |
|---|
| | | The latest version of slides for the session are available [here](https://docs.google.com/presentation/d/1FQ16TPWh3IrSnG97baaE1Tace9XV7p0uu0MdQuOdMZ4/edit?usp=sharing) |
|---|
| | | |
|---|
| | | |
|---|
| | | |
|---|
| | | |
|---|
| | | ## Facilitation Materials Needed |
|---|
| | | |
|---|
| | | * Table groups of 4-6 people |
|---|
| | | * Monitors and keyboards - one per pair |
|---|
| | | * Sticky notes - one small square per person, one large (A5) per pair, one big flip-chart page per table |
|---|
| | | * Sharpie pens and markers |
|---|
| | | * Wall space to display drawings |
|---|
| | | |
|---|
| | | |
|---|
| | | |
|---|
| | | ## Facilitation Guidelines |
|---|
| | | |
|---|
| | | * Present the slides to introduce Pairing and Mobbing, what they are, why we use them and show some examples. A YouTube video of Mob Programming is included in the deck and is useful to talk over as a group |
|---|
| | | * Present the residency examples provided in slides and encourage any Labs people present to talk about their experiences of using the practice |
|---|
| | | * Kick off [Pair Drawing exercise](https://www.industriallogic.com/blog/pairdraw-2/) and, for fun, extend to Mob Draw. |
|---|
| | | * Provide strong direction to the class that we want everyone to pair (or mob in 3 if uneven table size) during all the exercises to get experience of these practices. Explain that this allows more techie people some time to practice their coaching and explanation skills (something we need to do regularly with business stakeholders in residencies) and allows the less techie people to get a little hands-on with these very important engineering practices. Based on experience of the initial Enablement sessions, this discussion and positioning is very important. |
|---|
| | | * If monitors have not yet been set up on the tables, now is a good time to bring them in and set them up. |
|---|
| New file |
| | |
|---|
| | | # Wrap up and Post Enablement Activities |
|---|
| | | |
|---|
| | | > Final session to wrap up the 4 day Enablement. |
|---|
| | | _____ |
|---|
| | | |
|---|
| | | |
|---|
| | | ## Slides |
|---|
| | | |
|---|
| | | The latest version of slides for the session are available [here](https://docs.google.com/presentation/d/1veO6Q7yG1Kmy-3GfjZnGlsQ7NOXTyRBiYJWMA8y3CEE/edit?usp=sharing) |
|---|
| | | |
|---|
| | | |
|---|
| | | ## Facilitation Materials Needed |
|---|
| | | |
|---|
| | | * An open space for the whole group to form a large circle |
|---|
| | | |
|---|
| | | |
|---|
| | | |
|---|
| | | ## Facilitation Guidelines |
|---|
| | | |
|---|
| | | * If time has permitted to produce a short summary video or a slide deck of photos from the 4 days, show that now (it's a great visual way to reflect and summarise the week) |
|---|
| | | * If not done already, get a group photo of everyone |
|---|
| | | * Present slides with summary of all the practices we've introduced during the four days |
|---|
| | | * Show the links to the material we have open sourced including: |
|---|
| | | * Enablement Docs |
|---|
| | | * Labs CI/CD |
|---|
| | | * Open Practice Library |
|---|
| | | * Labs Book Library |
|---|
| | | * Run the Confidence Voting retrospective as described in the Retrospectives facilitation guide |
|---|
| | | * Encourage final updates of the Real Time Retrospective and also mention a post Enablement survey will be issued |
|---|
| | | * Go round the circle for some final impact feedback from each participant |
|---|
| | | * Have a final ritual of high fives before closing |
|---|
| | | |
|---|
| | | |
|---|
| | | |
|---|
| | | ## Post Facilitation |
|---|
| | | |
|---|
| | | * Photograph everything on walls, tables, boards, etc. and add to the media store that has hopefully grown during the week |
|---|
| | | * Send a wrap-up e-mail to everyone with links to repos, photos, videos shown, etc. Example [here](https://drive.google.com/open?id=1ljFJxYId0Sj7_zzXuNSTjU_g5BVB9bOC7NQ-xltAouo) |
|---|
| | | * Issue a survey. Example [here](https://drive.google.com/open?id=1pb-QuaGkcjsMji1H3RZ46VMXj3wAXBnuXH6lWYs7-u8) and encourage completion via e-mail, Slack, etc. |
|---|
| | | * After a week or so collate feedback responses into a summary. Example [here](https://drive.google.com/open?id=114fYkT3Tk1a98jmfJLunQpaoZLogtGXRKCmK-2SIZX8) |
|---|
| | | * Consider further feedback in a few months to assess success against the original target outcomes. |
|---|
| | | * Add everyone to the the Alumni channel in Slack |
|---|


