| | |
|---|
| | | # Revenge Of The Automated Testing |
|---|
| | | |
|---|
| | | > The purpose of this exercise is to develop and validate a new feature using TDD; and to promote the assured feature through the pipeline. |
|---|
| | | > The purpose of this exercise is to develop and validate a new feature using Test Driven Development (TDD); and to promote the assured feature through the pipeline. |
|---|
| | | |
|---|
| | |  |
|---|
| | | <!--  |
|---|
| | | |
|---|
| | | [Image Source](https://cdn-images-1.medium.com/max/1600/1*wF_fSCH-gLYfMbkwb3gR2w.png) |
|---|
| | | [Image Source](https://cdn-images-1.medium.com/max/1600/1*wF_fSCH-gLYfMbkwb3gR2w.png) --> |
|---|
| | | |
|---|
| | | ## Introduction to TDD. |
|---|
| | | |
|---|
| | | > _Here is a brief introduction of TDD and why we use it._ |
|---|
| | | <!-- > _Here is a brief introduction of TDD and why we use it._ --> |
|---|
| | | |
|---|
| | | **Test Driven Development (TDD)** is a software development process that relies on the repetition of a very short development cycle. Requirements are turned into test cases, where the software is developed to pass the tests. In other words, it creates a safety net that serves to keep the developer's problems/bugs at bay while enabling the developer to refactor efficiently. This is opposed to software development that allows software to be added that is not proven to meet requirements. |
|---|
| | | |
|---|
| | | The TDD cycle can be illustrated with the following diagram; |
|---|
| | | The TDD cycle can be illustrated with the following diagram: |
|---|
| | | |
|---|
| | |  |
|---|
| | | |
|---|
| | | ### The TDD Cycle |
|---|
| | |
|---|
| | | |
|---|
| | | ### Testing Bananalogy |
|---|
| | | Explanation of Mocha and JS test syntax through Bananalogy! Imagine for a moment; we're not building software but creating a bowl of fruit. To create a `Bunch of Bananas` component for our fruit bowl we could start with our tests as shown below. |
|---|
| | | |
|---|
| | |  |
|---|
| | | |
|---|
| | | * `describe` is used to group tests together. The string `"a bunch of ripe bananas"` is for human reading and allows you to identify tests. |
|---|
| | | * `it` is a statement that contains a test. It should contain an assertion such as `expect` or `should`. It follows the syntax of `describe` where the string passed in identifies the statement. |
|---|
| | | |
|---|
| | |
|---|
| | | |
|---|
| | | ## Tools and Frameworks |
|---|
| | | |
|---|
| | | > Name of tool - short description and link to docs or website |
|---|
| | | <!-- > Name of tool - short description and link to docs or website --> |
|---|
| | | |
|---|
| | | 1. [Jest](https://facebook.github.io/jest/) - Zero configuration testing platform |
|---|
| | | Jest is used by Facebook to test all JavaScript code including React applications. One of Jest's philosophies is to provide an integrated "zero-configuration" experience. We observed that when engineers are provided with ready-to-use tools, they end up writing more tests, which in turn results in more stable and healthy code bases. |
|---|
| | |
|---|
| | | - [ ] should display existing todos that are marked important with an red flag |
|---|
| | | |
|---|
| | | ## Step by Step Instructions |
|---|
| | | > This is a fairly structured guide with references to exact filenames and sections of text to be added. |
|---|
| | | <!-- > This is a fairly structured guide with references to exact filenames and sections of text to be added. --> |
|---|
| | | |
|---|
| | | ### Part 1 - Tests in our Pipeline |
|---|
| | | > _In this part we will get familiar with the layout of our tests. We will also improve the pipeline created already by adding some unit tests for the front end & backend along with some end to end tests (e2e) to validate the full solution_ |
|---|
| | | |
|---|
| | | #### 1a - FE Unit tests |
|---|
| | | #### 1a - Todo List Front End Unit tests |
|---|
| | | > In this exercise we will execute our test for the front end locally. Once verified we will add them to Jenkins. |
|---|
| | | |
|---|
| | | 1. Before linking our automated testing to the pipeline we'll first ensure the tests run locally. Change to the `todolist-fe` directory and run `test`. |
|---|
| | |
|---|
| | | <p class="tip" > |
|---|
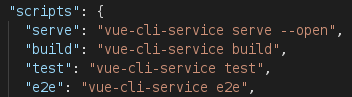
| | | `test` is an alias used that runs `vue-cli-service test` from the scripts object in `package.json` |
|---|
| | | </p> |
|---|
| | | |
|---|
| | |  |
|---|
| | | |
|---|
| | | 2. This command will run all `*spec.js` files. Our test files are stored in the following places. There are 12 front end test files stored in these directories: `todolist-fe/tests/unit/vue-components/*` & `todolist-fe/tests/unit/javascript/*` |
|---|
| | | |
|---|
| | | 2. You should see an output similar to the following. The above command has run a test suite for every `*.spec.js` file. The table generated in the terminal shows the code coverage. We're going to be focusing on the unit tests for now. |
|---|
| | | 3. You should see an output similar to the following. The above command has run a test suite for every `*.spec.js` file. The table generated in the terminal shows the code coverage. We're going to be focusing on the unit tests for now. |
|---|
| | | |
|---|
| | |  |
|---|
| | | |
|---|
| | | 2. Repeat the same process for `todolist-api` and verify that all the tests run. If you have an ExpressJS server already running from previous exercise; you should kill it before running the tests. The `mocha` test suite will launch a dev server for running the tests. There are 2 API test files: `todolist-api/server/api/todo/todo.spec.js` & `todolist-api/server/mocks/mock-routes.spec.js` for our API and the Mocks server. |
|---|
| | | 4. Repeat the same process for `todolist-api` and verify that all the tests run. If you have an ExpressJS server already running from previous exercise; you should kill it before running the tests. The `mocha` test suite will launch a dev server for running the tests. There are 2 API test files: `todolist-api/server/api/todo/todo.spec.js` & `todolist-api/server/mocks/mock-routes.spec.js` for our API and the Mocks server. Remember to start the `mongo` container before running the tests |
|---|
| | | ```bash |
|---|
| | | npm run mongo:start |
|---|
| | | ``` |
|---|
| | | ```bash |
|---|
| | | cd todolist-api |
|---|
| | | ``` |
|---|
| | |
|---|
| | | npm run test |
|---|
| | | ``` |
|---|
| | | |
|---|
| | | 2. Navigate to your instance of Jenkins at `https://jenkins-<YOUR_NAME>-ci-cd.<APPS_URL>`. |
|---|
| | | > NOTE: On Windows systems, tests will fail because Mocha is unable to find the `*.spec.js` files. Edit the `package.json` file, and remove the single quotes around `server/**/*.spec.js` in the `test` line as follows: |
|---|
| | | |
|---|
| | | ```bash |
|---|
| | | "test": "node_modules/.bin/nyc node_modules/.bin/mocha server/**/*.spec.js --exit" |
|---|
| | | ``` |
|---|
| | | |
|---|
| | | 5. Navigate to your instance of Jenkins at `https://jenkins-<YOUR_NAME>-ci-cd.<APPS_URL>`. |
|---|
| | | Click on `dev-todolist-fe-build` and then click the `configure` button on the left-hand side. |
|---|
| | | |
|---|
| | |  |
|---|
| | | |
|---|
| | | 2. Scroll to the `Build` part of the configuration page and add `npm run test` below `npm install`. |
|---|
| | | 6. Scroll to the `Build` part of the configuration page and add `npm run test` below `npm install`. |
|---|
| | | |
|---|
| | |  |
|---|
| | | |
|---|
| | | 2. Scroll to the `Post-build Actions` section and click `Add post-build action`. Select `Publish xUnit test result report` (Jenkins might place this at the top of the `Post-build Actions` list). |
|---|
| | | 7. Scroll to the `Post-build Actions` section and click `Add post-build action`. Select `Publish xUnit test result report` (Jenkins might place this at the top of the `Post-build Actions` list). |
|---|
| | | |
|---|
| | |  |
|---|
| | | |
|---|
| | | 2. Click the `Add` button under `Publish xUnit test result report` and select `JUnit`. In the pattern field enter `test-report.xml`. In the `Failed Tests Thresholds` input box enter 0 under `Red Ball Total`. It should look a little something like this: |
|---|
| | | 8. Click the `Add` button under `Publish xUnit test result report` and select `JUnit`. In the pattern field enter `test-report.xml`. In the `Failed Tests Thresholds` input box enter 0 under `Red Ball Total`. It should look a little something like this: |
|---|
| | | |
|---|
| | |  |
|---|
| | | |
|---|
| | | 2. Click `save` or `apply` at the bottom to save the changes. Run the `dev-todolist-fe-build` job and verify that this passes and the `build` and `bake` jobs are both triggered. |
|---|
| | | 9. Click `Save` at the bottom to save the changes. Run the `dev-todolist-fe-build` job and verify that this passes and the `build` and `bake` jobs are both triggered. |
|---|
| | | |
|---|
| | | #### (Optional) Failing the tests |
|---|
| | | <!-- #### (Optional) Failing the tests |
|---|
| | | > _If you're not very confident in your technical ability and want don't want to do the TDD lab; feel free to just do this next section. If you are confident jump on to the e2e testing section below_ |
|---|
| | | |
|---|
| | | 2. We're now going to deliberately fail a test to ensure that `bake` and `deploy` jobs aren't triggered if any tests fail. Open the `todolist-fe` source code in your favourite editor. Open `ListOfTodos.spec.js` in `/tests/unit/vue-components` and head to `line 39`. Add `not.` before `toHaveBeenCalled()` to fail the test. |
|---|
| | |
|---|
| | | 2. You can examine the test results on the jobs home page. Drill down into the tests to see which failed and other useful stats |
|---|
| | |  |
|---|
| | | |
|---|
| | | 2. Undo the changes you made to the `ListOfTodos.spec.js` file, commit your code and rerun the build. This should trigger a full `build --> bake --> deploy` of `todolist-fe`. |
|---|
| | | 2. Undo the changes you made to the `ListOfTodos.spec.js` file, commit your code and rerun the build. --> |
|---|
| | | |
|---|
| | | #### 1b - End to End tests (e2e) |
|---|
| | | #### 1b - End to End Tests (e2e) |
|---|
| | | > _Unit tests are a great way to get immediate feedback as part of testing an application. End to end tests that drive user behaviour are another amazing way to ensure an application is behaving as expected._ |
|---|
| | | |
|---|
| | | In this exercise we will add a new stage to our pipeline called `dev-todolist-fe-e2e` that will run after the deploy has been completed. End to end tests will use Nightwatchjs to orchestrate a selenium webdriver instance that controls the web browser; in this case Chrome! |
|---|
| | | In this part of the exercise, we will add a new stage to our pipeline called `dev-todolist-fe-e2e` that will run after the deploy has been completed. End to end tests will use `Nightwatch.js` to orchestrate a selenium webdriver instance that controls the web browser; in this case Google Chrome! |
|---|
| | | |
|---|
| | | 2. Let's start by checking our tests execute locally. On the terminal move to the `todolist-fe` folder. Our end to end tests are stored in `tests/e2e/specs/`. The vuejs cli uses nightwatch and comes pre-configured to run tests against Chrome. We have created some additional configuration in the root of the project `nightwatch.config.js` to run headless in CI mode on Jenkins. |
|---|
| | | 1. Let's start by checking that our tests execute locally. On the terminal move to the `todolist-fe` folder. Our end to end tests are stored in `tests/e2e/specs/`. The vuejs cli uses Nightwatch.js and comes pre-configured to run tests against Google Chrome. We have created some additional configuration in the root of the project `nightwatch.config.js` to run headless in CI mode on Jenkins. |
|---|
| | | ```bash |
|---|
| | | cd todolist-fe |
|---|
| | | ``` |
|---|
| | |
|---|
| | | ```bash |
|---|
| | | npm run e2e |
|---|
| | | ``` |
|---|
| | | |
|---|
| | |  |
|---|
| | | |
|---|
| | | 2. With tests executing locally; let's add them to our Jenkins pipeline. To do this; we'll create a new job and connect it up to our `todolist-fe` jobs. Open Jenkins and create a `New Item` called `dev-todolist-fe-e2e`. Make this Job `Freestyle`. |
|---|
| | | > NOTE: On Windows systems, you will see the firewall pop-up and ask permission to allow access. Click allow access to continue. |
|---|
| | | |
|---|
| | | 2. On the configuration page (under the general tab); Set the Label for the job to run on as `jenkins-slave-npm`. Check the box marking the build parameterised and add a String parameter of `BUILD_TAG` as done before |
|---|
| | | |
|---|
| | | 3. With tests executing locally; let's add them to our Jenkins pipeline. To do this; we'll create a new job and connect it up to our `todolist-fe` jobs. Open Jenkins and create a `New Item` called `dev-todolist-fe-e2e`. Make this Job `Freestyle`. |
|---|
| | | |
|---|
| | | 4. On the configuration page (under the general tab); Set the Label for the job to run on as `jenkins-slave-npm`. Check the box marking the build parameterised and add a String parameter of `BUILD_TAG` as done before |
|---|
| | | |
|---|
| | |  |
|---|
| | | |
|---|
| | | 2. On the Source Code Management tab; set the source code to git and add the url to your `todolist-fe` app. Set the branch to `refs/tags/${BUILD_TAG}` |
|---|
| | | 5. On the Source Code Management tab; set the source code to git and add the url to your `todolist-fe` app. Set the branch to `refs/tags/${BUILD_TAG}` |
|---|
| | | |
|---|
| | |  |
|---|
| | | |
|---|
| | | 2. Set `Color ANSI Console Output` on the `Build Environment` section |
|---|
| | | 6. Set `Color ANSI Console Output` on the `Build Environment` section |
|---|
| | | |
|---|
| | | 2. On the Build section; add a build step to execute shell and fill in the following substituting `<YOUR_NAME>` accordingly: |
|---|
| | | 7. On the Build section; add a build step to execute shell and fill in the following substituting `<YOUR_NAME>` accordingly: |
|---|
| | | ```bash |
|---|
| | | export E2E_TEST_ROUTE=todolist-fe-<YOUR_NAME>-dev.<APPS_URL> |
|---|
| | | npm install |
|---|
| | |
|---|
| | | ``` |
|---|
| | |  |
|---|
| | | |
|---|
| | | 2. Add a Post Build action to `Publish Junit test result report`. Add `reports/e2e/specs/*.xml` to the report location and save the configuration to be brought back to the Job's homepage. |
|---|
| | | 8. Add a Post Build action to `Publish Junit test result report`. Add `reports/e2e/specs/*.xml` to the report location and save the configuration to be brought back to the Job's homepage. |
|---|
| | | |
|---|
| | |  |
|---|
| | | |
|---|
| | | 2. We want to connect the e2e job we just created to our dev pipleline by editing the post build actions on `dev-todolist-fe-deploy` job. Open the `dev-todolist-fe-deploy` job and hit `configure`. In the `Post-build actions` section of this job add a `Trigger parameterised build` on other jobs. Set the `Projects to build` to be `dev-todolist-fe-e2e`. Add a Parameter and set the it to the `Current build parameters`. Save the settings. |
|---|
| | | 9. We want to connect the e2e job we just created to our dev pipleline by editing the post build actions on `dev-todolist-fe-deploy` job. Open the `dev-todolist-fe-deploy` job and hit `configure`. In the `Post-build actions` section of this job add a `Trigger parameterised build` on other jobs. Set the `Projects to build` to be `dev-todolist-fe-e2e`. Add a Parameter and set the it to the `Current build parameters`. Save the settings. |
|---|
| | | |
|---|
| | |  |
|---|
| | | |
|---|
| | | 2. Run the pipeline from the beginning to see the tests executed (two executions will show tests scores on the graph!). |
|---|
| | | 10. Run the pipeline from the beginning to see the e2e tests executed after deployment. |
|---|
| | | |
|---|
| | | ### Part 2 - TodoList new feature |
|---|
| | | > _In this exercise we will introduce a new feature to create an important flag on the todos. In order to be able to build and test our feature we will use TDD_ |
|---|
| | |
|---|
| | | #### 2a - Create todolist-api tests |
|---|
| | | > Using [Mocha](https://mochajs.org/) as our test runner; we will now write some tests for backend functionality to persist our important-flag. The changes required to the backend are minimal but we will use TDD to create our test first, then implement the functionality. |
|---|
| | | |
|---|
| | | 3. Create a new branch in your `todolist-api` app for our feature and push it to the remote |
|---|
| | | 1. Create a new branch in your `todolist-api` app for our feature and push it to the remote |
|---|
| | | ```bash |
|---|
| | | cd todolist-api |
|---|
| | | ``` |
|---|
| | | ```bash |
|---|
| | | git checkout -b feature/important-flag |
|---|
| | | ``` |
|---|
| | |
|---|
| | | git push -u origin feature/important-flag |
|---|
| | | ``` |
|---|
| | | |
|---|
| | | 3. Navigate to the `server/api/todo/todo.spec.js` file. This contains all of the existing todo list api tests. These are broken down into simple `describe("api definition", function(){})` blocks which is BDD speak for how the component being tested should behave. Inside of each `it("should do something ", function(){})` statements we use some snappy language to illustrate the expected behaviour of the test. For example a `GET` request of the api is described and tested for the return to be of type Array as follows. |
|---|
| | | 2. Navigate to the `server/api/todo/todo.spec.js` file. This contains all of the existing todo list api tests. These are broken down into simple `describe("api definition", function(){})` blocks which is BDD speak for how the component being tested should behave. Inside of each `it("should do something ", function(){})` statements we use some snappy language to illustrate the expected behaviour of the test. For example a `GET` request of the api is described and tested for the return to be of type Array as follows. |
|---|
| | | |
|---|
| | | ```javascript |
|---|
| | | describe("GET /api/todos", function() { |
|---|
| | | it("should respond with JSON array", function(done) { |
|---|
| | |
|---|
| | | - `done();` tells the test runner that `mocha` has finished execution. This is needed as the http calls are asynchronous. |
|---|
| | | |
|---|
| | | 3. With this knowledge; let's implement our test for the `important` flag. We expect the front end to introduce a new property on each `todo` that gets passed to the backend called `important`. The API will need to handle this new property and pass it into the mongodb. Let's begin implementing this functionality by writing our test case. Navigate to the `PUT /api/todos` section of the `server/api/todo/todo.spec.js` test file (which should be at the bottom) |
|---|
| | | |
|---|
| | |  |
|---|
| | | |
|---|
| | | 3. Before writing our test; let's first make sure all the existing tests are passing. |
|---|
| | | 4. Before writing our test; let's first make sure all the existing tests are passing. Ensure that your MongoDB container is running before running the tests (using the `npm run mongo:*` scripts) |
|---|
| | | |
|---|
| | | ```bash |
|---|
| | | npm run test |
|---|
| | | ``` |
|---|
| | | |
|---|
| | | 3. With all the tests passing; let's add our new one. For ease of completing this exercise a template of a new test has been written at the very end of the file (just below the ` // Exercise 3 test case!` comment). A PUT request responds in our API with the data that it has just updated. So provided that MongoDB accepted the change, the API will respond with an object that has the `important` property on it. To write our test; edit the template test by completing the following: |
|---|
| | | 5. With all the tests passing; let's add our new one. For ease of completing this exercise a template of a new test has been written at the very end of the file (just below the ` // Exercise 3 test case!` comment). A PUT request responds in our API with the data that it has just updated. So provided that MongoDB accepted the change, the API will respond with an object that has the `important` property on it. To write our test; edit the template test by completing the following: |
|---|
| | | * Edit the `it("should ...")` to describe the important flag we're testing |
|---|
| | | * Edit the `.send()` to include `important: true` property |
|---|
| | | * Edit the `.expect()` to be `.expect(200)` |
|---|
| | | * Add a new test assertion to check that `res.body.important` is `true` below the `// YOUR TEST GO HERE` line. |
|---|
| | | |
|---|
| | | ```javascript |
|---|
| | | // Exercise 3 test case! |
|---|
| | | it("should mark todo as important and persist it", function(done) { |
|---|
| | |
|---|
| | | }); |
|---|
| | | ``` |
|---|
| | | |
|---|
| | | 3. Run your test. It should fail. |
|---|
| | | 6. Run your test. It should fail. |
|---|
| | | ```bash |
|---|
| | | npm run test |
|---|
| | | ``` |
|---|
| | | |
|---|
| | |  |
|---|
| | | |
|---|
| | | 3. With our test now failing; let's implement the feature. This is quite a simple change - we first need to update the `server/api/todo/todo.model.js`. Add an additional property on the schema called `important` and make its type Boolean. |
|---|
| | | 7. With our test now failing; let's implement the feature. This is quite a simple change - we first need to update the `server/api/todo/todo.model.js`. Add an additional property on the schema called `important` and make its type Boolean. |
|---|
| | | |
|---|
| | | ```javascript |
|---|
| | | const TodoSchema = new Schema({ |
|---|
| | | title: String, |
|---|
| | | completed: Boolean, |
|---|
| | | completed: Boolean, |
|---|
| | | important: Boolean |
|---|
| | | }); |
|---|
| | | ``` |
|---|
| | | |
|---|
| | | 3. Next we need to update the `server/config/seed.js` file so that the pre-generated todos have an important property. Add `important: true` below `completed: *` for each object. Don't forget to add a comma at the end of the `completed: *` line. |
|---|
| | | 8. Next we need to update the `server/config/seed.js` file so that the pre-generated todos have an important property. Add `important: false` below `completed: *` for each object. Don't forget to add a comma at the end of the `completed: *` line. |
|---|
| | | |
|---|
| | |  |
|---|
| | | |
|---|
| | | 3. With your changes to the Database schema updated; re-run your tests. |
|---|
| | | 9. With your changes to the Database schema updated; re-run your tests. The tests should pass. |
|---|
| | | ```bash |
|---|
| | | npm run test |
|---|
| | | ``` |
|---|
| | | |
|---|
| | | 3. Commit your code to the `feature/important-flag` branch and then merge onto the `develop` branch as follows |
|---|
| | | <p class="tip"> |
|---|
| | | 10. Commit your code to the `feature/important-flag` branch and then merge onto the `develop` branch as follows |
|---|
| | | <!-- <p class="tip"> |
|---|
| | | NOTE - At this point in a residency we would peer review the code before pushing it to develop or master branch! |
|---|
| | | </p> |
|---|
| | | </p> --> |
|---|
| | | ```bash |
|---|
| | | git add . |
|---|
| | | ``` |
|---|
| | |
|---|
| | | git push |
|---|
| | | ``` |
|---|
| | | |
|---|
| | | 3. After pushing your changes; start back up the `todolist-api` app on a new terminal session |
|---|
| | | <!-- 3. After pushing your changes; start back up the `todolist-api` app on a new terminal session |
|---|
| | | ```bash |
|---|
| | | npm run start |
|---|
| | | ``` |
|---|
| | | ``` --> |
|---|
| | | |
|---|
| | | #### 2b - Create todolist-fe tests |
|---|
| | | > Using [Jest](https://facebook.github.io/jest/) as our test runner and the `vue-test-utils` library for managing our vue components; we will now write some tests for front end functionality to persist our important-flag. The changes required to the front end are quite large but we will use TDD to create our test first, then implement the functionality. |
|---|
| | |
|---|
| | | |
|---|
| | | The implementation of our `important` flag will follow this same flow. |
|---|
| | | |
|---|
| | | 3. Let's implement our feature by first creating a branch. Our new feature, important flag will behave in the same way as the `MARK_TODO_COMPLETED`. Create a new branch in your `todolist-fe` app for our feature and push it to the remote |
|---|
| | | 1. Let's implement our feature by first creating a branch. Our new feature, important flag will behave in the same way as the `MARK_TODO_COMPLETED`. Create a new branch in your `todolist-fe` app for our feature and push it to the remote |
|---|
| | | |
|---|
| | | ```bash |
|---|
| | | cd todolist-fe |
|---|
| | | ``` |
|---|
| | | ```bash |
|---|
| | | git checkout -b feature/important-flag |
|---|
| | | ``` |
|---|
| | |
|---|
| | | git push -u origin feature/important-flag |
|---|
| | | ``` |
|---|
| | | |
|---|
| | | 3. Let's get our tests running by executing a `--watch` on our tests. This will keep re-running our tests everytime there is a file change. It is handy to have this running in a new terminal session. |
|---|
| | | 2. Let's get our tests running by executing a `--watch` on our tests. This will keep re-running our tests everytime there is a file change. It is handy to have this running in a new terminal session. |
|---|
| | | ```bash |
|---|
| | | npm run test -- --watch |
|---|
| | | ``` |
|---|
| | | |
|---|
| | | 3. All the tests should be passing when we begin. If `No tests found related to files changed since last commit` is on show; hit `a` on the terminal to re-run `all` tests. |
|---|
| | | |
|---|
| | |  |
|---|
| | | |
|---|
| | | 3. There are three places we will add new tests to validate our function behaves as expected against the acceptance criteria from the Feature Story supplied to us. We will need to write tests for our `TodoItem.vue` to handle having a red flag and that it is clickable. Our app is going to need to persist the changes in the backend so we'll want to make changes to our `actions.js` and `mutations.js` to keep the api and local copy of the store in sync. Let's start with our `TodoItem.vue` component. Open the `tests/unit/vue-components/TodoItem.spec.js` file. This has been templated with some example test to correspond with our A/Cs for speed of doing the exercise. Find the describe block for our important flag tests. It is setup already with a `beforeEach()` hook for test setup. |
|---|
| | | 4. There are three places we will add new tests to validate our function behaves as expected against the acceptance criteria from the Feature Story supplied to us. We will need to write tests for our `TodoItem.vue` to handle having a red flag and that it is clickable. Our app is going to need to persist the changes in the backend so we'll want to make changes to our `actions.js` and `mutations.js` to keep the api and local copy of the store in sync. Let's start with our `TodoItem.vue` component. Open the `tests/unit/vue-components/TodoItem.spec.js` file. This has been templated with some example test to correspond with our A/Cs for speed of doing the exercise. Find the describe block for our important flag tests. It is setup already with a `beforeEach()` hook for test setup. |
|---|
| | | |
|---|
| | |  |
|---|
| | | |
|---|
| | | 3. Each of our test cases has its skeleton in place already for example the `TodoItem.vue` component takes a property of `todos` when rendering. This setup is already done for each of our tests so all we have to do is fill in our assertions. |
|---|
| | | 5. Each of our test cases has its skeleton in place already for example the `TodoItem.vue` component takes a property of `todos` when rendering. This setup is already done for each of our tests so all we have to do is fill in our assertions. |
|---|
| | | |
|---|
| | |  |
|---|
| | | |
|---|
| | | 3. Let's implement the first test `it("should render a button with important flag"`. This test will assert if the button is present on the page and it contains the `.important-flag` CSS class. To implement this; add the `expect` statement as follows below the `// TODO - test goes here!` comment. |
|---|
| | | 6. Let's implement the first test `it("should render a button with important flag"`. This test will assert if the button is present on the page and it contains the `.important-flag` CSS class. To implement this; add the `expect` statement as follows below the `// TODO - test goes here!` comment. |
|---|
| | | |
|---|
| | | ```javascript |
|---|
| | | it("should render a button with important flag", () => { |
|---|
| | | const wrapper = mount(TodoItem, { |
|---|
| | |
|---|
| | | }); |
|---|
| | | ``` |
|---|
| | | |
|---|
| | | 3. Save the file and we should see in our test watch the test case has started failing because we have not yet implemented the feature! |
|---|
| | | 7. Save the file. Observe that the test case has started failing because we have not yet implemented the feature! |
|---|
| | | |
|---|
| | |  |
|---|
| | | |
|---|
| | | 3. With a basic assertion in place, let's continue on to the next few tests. We want the important flag to be red when an item in the todolist is marked accordingly. Conversely we want it to be not red when false. Let's create a check for `.red-flag` CSS property to be present when important is true and not when false. Complete the `expect` statements in your test file as shown below for both tests. |
|---|
| | | 8. With a basic assertion in place, let's continue on to the next few tests. We want the important flag to be red when an item in the todolist is marked accordingly. Conversely we want it to be not red when false. Let's create a check for `.red-flag` CSS property to be present when important is true and not when false. Complete the `expect` statements in your test file as shown below for both tests. |
|---|
| | | |
|---|
| | | ```javascript |
|---|
| | | it("should set the colour to red when true", () => { |
|---|
| | | const wrapper = mount(TodoItem, { |
|---|
| | |
|---|
| | | }); |
|---|
| | | ``` |
|---|
| | | |
|---|
| | | 3. Finally, we want to make the flag clickable and for it to call a function to update the state. The final test in the `TodoItem.spec.js` we want to create should simulate this behaviour. Implement the `it("call markImportant when clicked", () ` test by first simulating the click of our important-flag and asserting the function `markImportant()` to write is executed. |
|---|
| | | 9. Finally, we want to make the flag clickable and for it to call a function to update the state. The final test in the `TodoItem.spec.js` we want to create should simulate this behaviour. Implement the `it("call markImportant when clicked", () ` test by first simulating the click of our important-flag and asserting the function `markImportant()` to write is executed. |
|---|
| | | |
|---|
| | | ```javascript |
|---|
| | | it("call markImportant when clicked", () => { |
|---|
| | | const wrapper = mount(TodoItem, { |
|---|
| | |
|---|
| | | }); |
|---|
| | | ``` |
|---|
| | | |
|---|
| | | 3. With our tests written for the feature's UI component, let's implement our code to pass the tests. Explore the `src/components/TodoItem.vue`. Each vue file is broken down into 3 sections |
|---|
| | | 10. With our tests written for the feature's UI component, let's implement our code to pass the tests. Explore the `src/components/TodoItem.vue`. Each vue file is broken down into 3 sections |
|---|
| | | |
|---|
| | | * The `<template></template>` contains the HTML of our component. This could include references to other Components also |
|---|
| | | * The `<script></script>` contains the JavaScript of our component and is essentially the logic for our component. It defines things like `properties`, `methods` and other `components` |
|---|
| | | * The `<style></style>` contains the encapsulated CSS of our component |
|---|
| | | |
|---|
| | | 3. Underneath the `</md-list-item>` tag, let's add a new md-button. Add an `.important-flag` class on the `md-button` and put the svg of the flag provided inside it. |
|---|
| | | 11. Underneath the `</md-list-item>` tag, let's add a new md-button. Add an `.important-flag` class on the `md-button` and put the svg of the flag provided inside it. |
|---|
| | | |
|---|
| | | ```html |
|---|
| | | </md-list-item> |
|---|
| | | <!-- TODO - SVG for use in Exercise3 --> |
|---|
| | |
|---|
| | | </md-button> |
|---|
| | | ``` |
|---|
| | | |
|---|
| | | 3. We should now see the first of our failing tests has started to pass. Running the app locally (using `npm run serve`) should show the flag appear in the UI. It is clickable but won't fire any events and the colour is not red as per our requirement. Let's continue to implement the colour change for the flag. On our `<svg/>` tag, add some logic to bind the css to the property of a `todo.important` by adding ` :class="{'red-flag': todoItem.important}" `. This logic will apply the CSS class when `todo.important` is true. |
|---|
| | | 12. We should now see the first of our failing tests has started to pass. Running the app locally (using `npm run serve`) should show the flag appear in the UI. It is clickable but won't fire any events and the colour is not red as per our requirement. Let's continue to implement the colour change for the flag. On our `<svg/>` tag, add some logic to bind the css to the property of a `todo.important` by adding ` :class="{'red-flag': todoItem.important}" `. This logic will apply the CSS class when `todo.important` is true. |
|---|
| | | |
|---|
| | | ```html |
|---|
| | | <md-button class="important-flag"> |
|---|
| | | <svg :class="{'red-flag': todoItem.important}" height="24" viewBox="0 0 24 24" width="24" xmlns="http://www.w3.org/2000/svg" ><path d="M0 0h24v24H0z" fill="none"/><path d="M14.4 6L14 4H5v17h2v-7h5.6l.4 2h7V6z"/></svg> |
|---|
| | | </md-button> |
|---|
| | | ``` |
|---|
| | | |
|---|
| | | 3. More tests should now be passing. Let's wire the click of the flag to an event in Javascript. In the methods section of the `<script></script>` tags in the Vue file, implement the `markImportant()`. We want to wire this to the action to updateTodo, just like we have in the `markCompleted()` call above it. We also need to pass an additional property to this method called `important` |
|---|
| | | 13. More tests should now be passing. Let's wire the click of the flag to an event in Javascript. In the methods section of the `<script></script>` tags in the Vue file, implement the `markImportant()`. We want to wire this to the action to updateTodo, just like we have in the `markCompleted()` call above it. We also need to pass an additional property to this method called `important` |
|---|
| | | |
|---|
| | | ```javascript |
|---|
| | | markImportant() { |
|---|
| | | // TODO - FILL THIS OUT IN THE EXERCISE |
|---|
| | |
|---|
| | | }, |
|---|
| | | ``` |
|---|
| | | |
|---|
| | | 3. Let's connect the click button in the DOM to the Javascript function we've just created. In the template, add a click handler to the md-button to call the function `markImportant()` by adding ` @click="markImportant()"` to the `<md-button>` tag |
|---|
| | | 14. Let's connect the click button in the DOM to the Javascript function we've just created. In the template, add a click handler to the md-button to call the function `markImportant()` by adding ` @click="markImportant()"` to the `<md-button>` tag |
|---|
| | | |
|---|
| | | ```html |
|---|
| | | <!-- TODO - SVG for use in Exercise3 --> |
|---|
| | | <md-button class="important-flag" @click="markImportant()"> |
|---|
| | |
|---|
| | | </md-button> |
|---|
| | | ``` |
|---|
| | | |
|---|
| | | 3. Finally - we need to make it so that when a new todo item is created it will have an important property. Head to `store/actions.js` and add `important: false` below `completed: false` in the `addTodo(){}` action. |
|---|
| | |  |
|---|
| | | 15. Finally - we need to make it so that when a new todo item is created it will have an important property. Head to `store/actions.js` and add `important: false` below `completed: false` in the `addTodo(){}` action. |
|---|
| | | |
|---|
| | |  |
|---|
| | | |
|---|
| | | |
|---|
| | | 3. The previously failing tests should have started to pass now. With this work done, let's commit our code. On the terminal, run |
|---|
| | | 16. The previously failing tests should have started to pass now. With this work done, let's commit our code. On the terminal, run |
|---|
| | | ```bash |
|---|
| | | git add . |
|---|
| | | ``` |
|---|
| | |
|---|
| | | ```bash |
|---|
| | | git push |
|---|
| | | ``` |
|---|
| | | 17. Start our local development server to test the changes |
|---|
| | | |
|---|
| | | 3. Open our local todolist app (http://localhost:8080/#/todo). If we try to use our important flag, we should see it's still not behaving as expected; this is because we're not updating the state of the app in response to the click event. |
|---|
| | | ```bash |
|---|
| | | npm run serve |
|---|
| | | ``` |
|---|
| | | |
|---|
| | | 3. We need to implement the `actions` and `mutations` for our feature. Let's start with the tests. Open the `tests/unit/javascript/actions.spec.js` and navigate to the bottom of the file. Our action should should commit the `MARK_TODO_IMPORTANT` to the mutations. Scroll to the end of the test file and implement the skeleton test by adding `expect(commit.firstCall.args[0]).toBe("MARK_TODO_IMPORTANT");` as the assertion. |
|---|
| | | 18. Open our local todolist app (http://localhost:8080/#/todo). If we try to use our important flag, we should see it's still not behaving as expected; this is because we're not updating the state of the app in response to the click event. |
|---|
| | | |
|---|
| | | 19. We need to implement the `actions` and `mutations` for our feature. Let's start with the tests. Open the `tests/unit/javascript/actions.spec.js` and navigate to the bottom of the file. Our action should should commit the `MARK_TODO_IMPORTANT` to the mutations. Scroll to the end of the test file and implement the skeleton test by adding `expect(commit.firstCall.args[0]).toBe("MARK_TODO_IMPORTANT");` as the assertion. |
|---|
| | | |
|---|
| | | ```javascript |
|---|
| | | it("should call MARK_TODO_IMPORTANT", done => { |
|---|
| | | const commit = sinon.spy(); |
|---|
| | |
|---|
| | | }); |
|---|
| | | ``` |
|---|
| | | |
|---|
| | | 3. We should now have more failing tests, let's fix this by adding the call from our action to the mutation method. Open the `src/store/actions.js` file and scroll to the bottom to the `updateTodo()` method. Complete the if block by adding `commit("MARK_TODO_IMPORTANT", i);` as shown below. |
|---|
| | | 20. We should now have more failing tests, let's fix this by adding the call from our action to the mutation method. Open the `src/store/actions.js` file and scroll to the bottom to the `updateTodo()` method. Complete the if block by adding `commit("MARK_TODO_IMPORTANT", i);` as shown below. |
|---|
| | | |
|---|
| | | ```javascript |
|---|
| | | updateTodo({ commit, state }, { id, important }) { |
|---|
| | | let i = state.todos.findIndex(todo => todo._id === id); |
|---|
| | |
|---|
| | | } |
|---|
| | | ``` |
|---|
| | | |
|---|
| | | 3. Finally, let's implement the `mutation` for our feature. Again, starting with the tests... Open the `tests/unit/javascript/mutations.spec.js` to find our skeleton tests at the bottom of the file. Our mutation method is responsible for toggling the todo's `important` property between `true` and `false`. Let's implement the tests for this functionality by setting important to be true and calling the method expecting the inverse. Then let's set it to false and call the method expecting the inverse. Add the expectations below the `// TODO - test goes here!` comment as done previously. |
|---|
| | | 21. Finally, let's implement the `mutation` for our feature. Again, starting with the tests... Open the `tests/unit/javascript/mutations.spec.js` to find our skeleton tests at the bottom of the file. Our mutation method is responsible for toggling the todo's `important` property between `true` and `false`. Let's implement the tests for this functionality by setting important to be true and calling the method expecting the inverse. Then let's set it to false and call the method expecting the inverse. Add the expectations below the `// TODO - test goes here!` comment as done previously. |
|---|
| | | |
|---|
| | | ```javascript |
|---|
| | | it("it should MARK_TODO_IMPORTANT as false", () => { |
|---|
| | | state.todos = importantTodos; |
|---|
| | |
|---|
| | | }); |
|---|
| | | ``` |
|---|
| | | |
|---|
| | | 3. With our tests running and failing, let's implement the feature to their spec. Open the `src/store/mutations.js` and add another function called `MARK_TODO_IMPORTANT` below the `MARK_TODO_COMPLETED` to toggle `todo.important` between true and false. NOTE - add a `,` at the end of the `MARK_TODO_COMPLETED(){}` function call. |
|---|
| | | 22. With our tests running and failing, let's implement the feature to their spec. Open the `src/store/mutations.js` and add another function called `MARK_TODO_IMPORTANT` below the `MARK_TODO_COMPLETED` to toggle `todo.important` between true and false. NOTE - add a `,` at the end of the `MARK_TODO_COMPLETED(){}` function call. |
|---|
| | | |
|---|
| | | ```javascript |
|---|
| | | MARK_TODO_IMPORTANT(state, index) { |
|---|
| | | console.log("INFO - MARK_TODO_IMPORTANT"); |
|---|
| | | state.todos[index].important = !state.todos[index].important; |
|---|
| | | } |
|---|
| | | ``` |
|---|
| | | |
|---|
| | |  |
|---|
| | | |
|---|
| | | 3. All our tests should now be passing. On the watch tab where they are running, hit `a` to re-run all tests and update any snapshots with `u` if needed. |
|---|
| | | 23. All our tests should now be passing. On the watch tab where they are running, hit `a` to re-run all tests and update any snapshots with `u` if needed. |
|---|
| | | |
|---|
| | | 3. With all our tests now passing, let's commit our code. On the terminal, run |
|---|
| | | 24. With all our tests now passing, let's commit our code. On the terminal, run |
|---|
| | | |
|---|
| | | ```bash |
|---|
| | | git add . |
|---|
| | | ``` |
|---|
| | |
|---|
| | | git push |
|---|
| | | ``` |
|---|
| | | |
|---|
| | | 3. Before running a build in Jenkins, let's add our tests and code to the develop branch. Ask your neighbour to review your code changes and if they approve; merge them to Develop! (If you're feeling adventurous - raise a PR through GitLab and have someone on your desk peer review it!) |
|---|
| | | <p class="tip"> |
|---|
| | | 25. Before running a build in Jenkins, let's add our tests and code to the develop branch. Ask your neighbour to review your code changes and if they approve; merge them to Develop! (If you're feeling adventurous - raise a PR through GitLab and have someone on your desk peer review it!) |
|---|
| | | |
|---|
| | | <!-- <p class="tip"> |
|---|
| | | NOTE - At this point in a residency we would peer review the code before pushing it to develop or master branch! |
|---|
| | | </p> |
|---|
| | | </p> --> |
|---|
| | | |
|---|
| | | ```bash |
|---|
| | | git checkout develop |
|---|
| | | ``` |
|---|
| | |
|---|
| | | git push --all |
|---|
| | | ``` |
|---|
| | | |
|---|
| | | 3. Run a build in Jenkins. If all things were successful; our application should be deployed as expected! Validate the flag is working as expected. |
|---|
| | | 26. Run a build in Jenkins. If all things were successful; our application should be deployed as expected! Validate the flag is working as expected. Invoke the route URL for the application from the `*-dev` namespace in the OCP web console. |
|---|
| | | |
|---|
| | |  |
|---|
| | | |
|---|
| | | #### 2c - Create todolist e2e tests |
|---|
| | | |
|---|
| | | > Using [Nightwatch.js](http://nightwatchjs.org/) We will write a reasonably simple e2e test to test the functionality of the feature we just implemented. |
|---|
| | | |
|---|
| | | 3. Firstly we need to create an e2e spec test file in the correct place. |
|---|
| | | 1. Firstly we need to create an e2e spec test file in the correct place. |
|---|
| | | |
|---|
| | | ```bash |
|---|
| | | touch tests/e2e/specs/importantFlag.js |
|---|
| | | ``` |
|---|
| | | |
|---|
| | | 3. Open this new file in your code editor and set out the initial blank template for an e2e test as below: |
|---|
| | | > NOTE: Windows users should create this new file using a text editor. |
|---|
| | | |
|---|
| | | 2. Open this new file in your code editor and set out the initial blank template for an e2e test as below: |
|---|
| | | |
|---|
| | |  |
|---|
| | | |
|---|
| | | 3. Now get the test to access the todos page and wait for it to load. The url can be taken from `process.env.VUE_DEV_SERVER_URL` |
|---|
| | | |
|---|
| | |  |
|---|
| | | |
|---|
| | | 3. Now click the clear all button and then enter a value in the textbox to create a new item. We clear all first to ensure we start with a fresh list. We now do our first assertion: that a 'important flag' exists (the button to set important), and also that a red flag does not exist. You will quickly find there is no way to reference the clear all button. We will therefore have to go to `src/components/XofYItems.vue` and add `id="clear-all"` to the clear all button. |
|---|
| | |  |
|---|
| | | 4. Write code to do the following: |
|---|
| | | * Click the clear all button and then enter a value in the textbox to create a new item. |
|---|
| | | * Assert that an 'important flag' exists (the button to set important) |
|---|
| | | * Assert that a red flag does not exist. |
|---|
| | | * Click the important flag and check whether the flag has turned red. |
|---|
| | | |
|---|
| | | 5. You will need to reference the clear all button from the test code. We will therefore have to go to `src/components/XofYItems.vue` and add `id="clear-all"` to the clear all button. |
|---|
| | | |
|---|
| | | <!--  --> |
|---|
| | |  |
|---|
| | | |
|---|
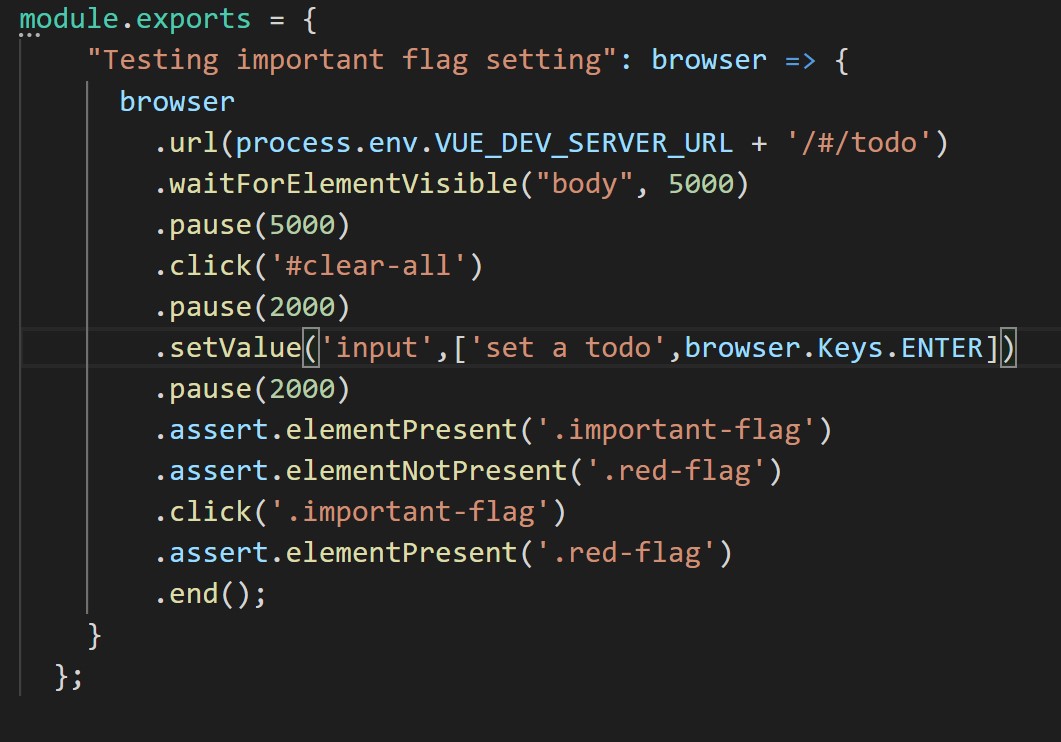
| | | 3. We should now get nightwatch to click the flag and check whether the flag has turned red. |
|---|
| | |  |
|---|
| | | 6. Write the following test code. The pauses allow for the body of the page to render the todo list before exercising the test code: |
|---|
| | | |
|---|
| | | 3. At this point we should have a working e2e test. We can run this by using `npm run e2e`. When satisfied we can push up these changes. |
|---|
| | | <!--  --> |
|---|
| | |  |
|---|
| | | |
|---|
| | | 7. At this point we should have a working e2e test. We can run this by using `npm run e2e`. When all tests pass, we can push up these changes. |
|---|
| | | |
|---|
| | | ```bash |
|---|
| | | git add . |
|---|
| | |
|---|
| | | |
|---|
| | | --- |
|---|
| | | |
|---|
| | | ## Extension Tasks |
|---|
| | | <!-- ## Extension Tasks |
|---|
| | | |
|---|
| | | > _Ideas for go-getters. Advanced topic for doers to get on with if they finish early. These will usually not have a solution and are provided for additional scope._ |
|---|
| | | |
|---|
| | |
|---|
| | | |
|---|
| | | - [Intro](https://docs.google.com/presentation/d/18W0GoBTwRGpgbOyHf2ZnL_OIWU_DvsoR14H0_t5jisA) |
|---|
| | | - [Wrap-up](https://docs.google.com/presentation/d/1uIYHC57POSaVD6XNZGhdetABiSnlP1TztYTgglMP-DA) |
|---|
| | | - [All Material](https://drive.google.com/drive/folders/1xVaQukmwwmyJSDN0zOkghZX7yb-0freT) |
|---|
| | | - [All Material](https://drive.google.com/drive/folders/1xVaQukmwwmyJSDN0zOkghZX7yb-0freT) --> |
|---|


